
Would you like your photographs to be professional art? In case you are a beginner and you would like to know how to learn in a simple manner with a step-by-step tutorial and using images, consider it a Photoshop tutorial step-by-step with images! I am a digital designer who has been working on the device for many years.
I can recall how frightening the screen was when I first opened the device. Today, I apply these tools on a daily basis to make magic for my clients. It has happened to me that you do not have to be a technological genius to use this software; you just have to do it in a straight line.
The future of Photoshop is even more thrilling in 2026 due to the new generative AI features. Do you want to commission a portrait of your family or make a funny photo of your cat in space? I am here to assist you.
I have experimented with all the shortcuts and tools to determine the ones that people find easy to learn. Believe me, you can do whatever you want to do as soon as you learn the language of Photoshop!
Photoshop Tutorial Step by Step with Images
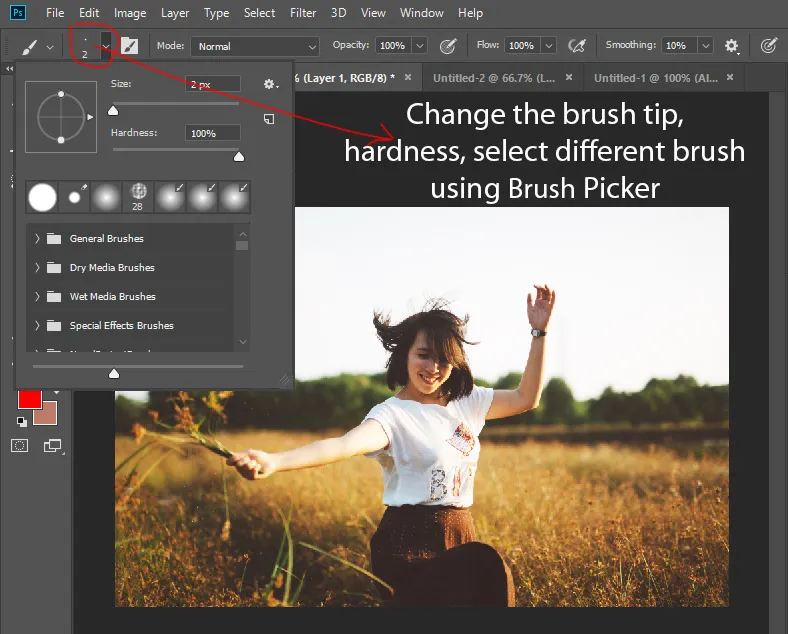
To have a step-by-step application of a Photoshop tutorial with examples, you have to know what a workspace is. A new project will open with a large empty field in the middle. On the left you can find a toolbar containing all your brushes and pens. There is the layers panel on the right. It is the most significant part of the entire program!
Imagine that there are layers that are similar to transparent sheets of plastic that are placed one on top of another. On one you can draw a hat, and on the other a face. If you do not like the hat, just put away that covering; you see, you do not spoil the face! This is referred to as non-destructive editing, and it is the secret to becoming a great designer.
Getting Started: Your First Project
It is always good to learn by doing. In this step-by-step photo editing tutorial of Photoshop, we are going to perform a basic modification on a photo.
Step 1: Open Your Image
Select a picture by clicking on File > Open and choosing one of the pictures on your computer. A JPEG file can also be dropped into the window. You will find your photo on the screen!
You may also read :- Photography Tutorial for Beginners: Learn the Basics
Step 2: Create a New Layer
Eyewitness to the bottom right. Click the small icon of a plus sign (+). This leaves a layered surface that is fresh and empty. You should never work on the original picture because you will forever alter it. This is one of my pro habits, which I always impart to my students.
Mastering the Basic Tools for Beginners
In the Photoshop tutorial, step by step using images, a few simple tools will be enough to create something astonishing. You need not know all the 50 buttons today!
The Move Tool (V)
This resembles a miniature crosshair. Drag this to relocate your pictures or text. It is the tool that you are going to need most.
The Selection Brush Tool
In 2026, this tool is super smart. You only need to paint over another person or a tree, and Photoshop will automatically understand what you wish to capture. This is ideal in eliminating the backgrounds or shifting somebody from one photo to another.
The Brush Tool (B)
This is for painting! The color will be changed by clicking on the two squares at the bottom of the toolbar. In case you go wrong, you can simply use Ctrl + Z (or Cmd + Z on Mac) to undo.
How to Use Generative Fill in 2026
That is the magic of our photo tutorial that will be done step by step with pictures. Generative Fill is an AI-based application that adds objects to your photo that were not there previously.
- Choose an area: Click on the Lasso Tool and circle a point in your picture.
- Type a prompt: A small bar would appear. Enter some words such as "fluffy white dog" or "blue sunglasses."
- Click Generate: Photoshop will provide you with three different options in a few seconds!
It is a good idea to inject some cool special effects or correct a background that may seem to be a bit boring.
Retouching Photos Like a Pro
In case you have a pimple in a picture or there is a strand of hair that has slipped, you can use the Spot Healing Brush. It appears like a small bandage.
Using the Bandage Tool
All you have to do is to press a spot where you would rather vanish! Photoshop considers the colors surrounding it and mixes it in a perfect way. It is such a magic eraser for your skin. I apply it whenever I am editing a portrait of a friend.
Adjusting Brightness and Color
In case of a dark photo, proceed to Image/Adjustments/Brightness/Contrast. Move the bar to the right and get the sun to shine! Hue/Saturation to make colors pop and look more colorful can also be used.
Essential Photoshop Shortcuts for Speed
These are the "secret keys" to working fast like an expert. Their use will help to make you look like a professional in the eyes of your friends!
- V: Move Tool
- B: Brush Tool
- Z: Zoom (Click to zoom in, Alt + Click to zoom out)
- Spacebar: This is a button that you use to move your view in a hand-like movement.
- and ]: draw your brush less or more.
Educated Thought: "Sufficiency in the language of haste. When you are familiar with the placement of the keys, you cease to think about the software and begin thinking about the art. I believe that becoming a digital artist is essential for every person. It is my feeling that anyone should become a digital artist.
Saving Your Work Correctly
By the end of your Photoshop tutorial with step-by-step pictures, you will have to save it. You can save it in an APD file in case you need to resume working later. You can save it as a JPEG or PNG in case you need to post it on Instagram or share it with someone.
- Go to File > Export > Export As.
- Choose "JPG" for photos.
- Click Export, and name your masterpiece!
Your Next Steps in Digital Art
You have successfully completed your first Photoshop tutorial step-by-step with images! You now know how to open a file, use layers, and indeed play with AI. The best way to get better is to practice for 10 minutes every day. Try taking a photo of your patio and adding a castle to it!
Don't be afraid to click buttons and see what they do. You can't break the program! The more you play, the quicker you will learn. I am so excited to see what you create.
Would you like me to walk you through a specific tutorial on how to change your hair color in a photo?
Frequently Asked Questions
Is Photoshop free?
Adobe offers a free trial for 7 days. After that, you usually require a subscription. However, there are versatile adaptations like Photoshop Express that are free to use!
Do I require a special computer?
Photoshop works best on a computer with at least 8 GB of RAM. In 2026, most new laptops can run it fairly fine.
How do I fix a botch?
Press Ctrl + Z on Windows or Cmd + Z on a Mac. You can press it many times to go back in time!
What is the difference between Photoshop and Lightroom?
Photoshop is for huge changes (like adding a dragon to a photo). Lightroom is superior for settling the lighting on 100 photos at once.
Can I utilize Photoshop on my iPad?
Yes! There is a great iPad form that works with the Apple Pencil. It feels as fair as drawing on paper.