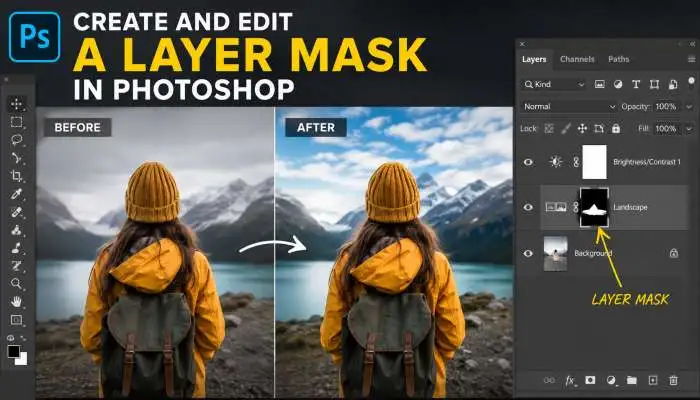
Have you ever erased something in Photoshop and then wished you could bring it back? We have all been there. You erase a part of a photo, save your file, and then two days later you want that part again. Too bad. It is gone forever. That feels terrible, right?
But here is the good news. You do not need to erase ever again. The photoshop layer mask fixes this problem for good. It lets you hide parts of a layer instead of deleting them. Think of it like a blanket. You cover what you do not want to see, but the blanket can come off anytime. Nothing gets lost.
I have used Photoshop for over ten years as a photo retoucher. In my first year, I erased everything. I regret those days. Then a senior designer showed me layer masks. My work changed overnight. Now I will teach you the same tricks. You will learn fast, without big words or confusion.
Let us start from zero. By the end of this post, you will use a photoshop layer mask like a pro. You will also know how to fix common problems like the Apply layer mask greyed out error. Ready? Let’s go.
What Exactly Is a Photoshop Layer Mask?
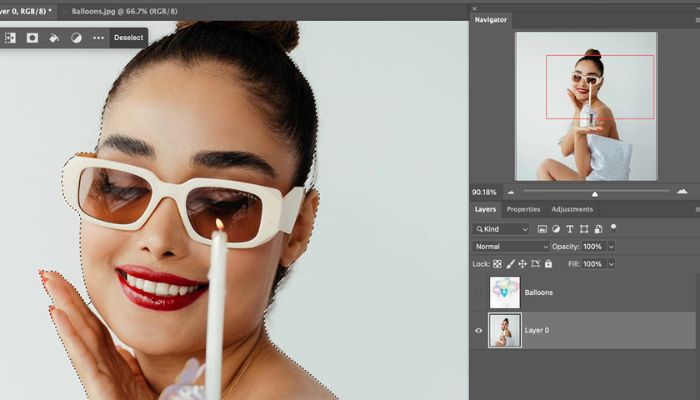
A photoshop layer mask is a tool that controls a layer’s visibility. You add a mask to any layer. Then you paint on the mask with black, white, or gray.
- Black paint hides the layer where you paint.
- White paint shows the layer again.
- Gray paint makes the layer see‑through (soft edges).
The best part? You never delete a single pixel. Your original image stays safe. You can change your mask hundreds of times. No stress, no regret.
You may also read :- Photoshop AI Tools Tutorial: The Ultimate 2026 Guide for Beginners
Why Every Beginner Needs a Photoshop Layer Mask
How to use Photoshop Layer Masks for beginners starts with one big reason: safety. When you erase, you destroy data. When you mask, you only hide data. That means you can experiment freely.
For example, you want to put one person’s face on another body. You add a mask to the face layer. You paint black over the edges you want to hide. If you hide too much, just switch to white paint and bring it back. Try doing that with the eraser tool. You cannot.
Expert quote: “Layer masks are the undo button for creativity. They give you the courage to try wild things because nothing is permanent.” – Jessica R., professional digital artist.
How to Create a Photoshop Layer Mask? (Three Easy Ways)
Let me show you how to create a layer mask in photoshop right now. Follow these steps with your own image.
Method 1 – The Mask Icon (Easiest)
- Select your layer in the Layers panel.
- Click the rectangle with a circle inside (bottom of the panel).
- A white box appears next to your layer thumbnail. That is your mask.
- Select the Brush tool (B key). Paint black to hide, white to show.
Method 2 – From a Selection
- Use any selection tool (like the Lasso or Magic Wand) to select an area.
- Click the mask icon. Photoshop creates a mask that shows only your selection.
Method 3 – Hide Everything First
- Hold Alt (PC) or Option (Mac) and click the mask icon.
- This adds a black mask, hiding the whole layer.
- Paint with white to reveal what you want.
I use Method 1 for most jobs. It is quick and clean.
The Fastest Layer Mask Photoshop Shortcut You Need
The Layer mask Photoshop shortcut saves you hours. Here are the top three:
- Alt + Click (PC) / Option + Click (Mac) on the mask thumbnail: View only the mask (black and white).
- Shift + Click on the mask thumbnail: Turn the mask off and on (great for before‑after checks).
- Ctrl + I (PC) / Command + I (Mac) while selecting the mask: Invert black to white or white to black.
Memorize these. They make masking feel like a game instead of a job.
Solve the “Apply Layer Mask Greyed Out” Problem Right Now
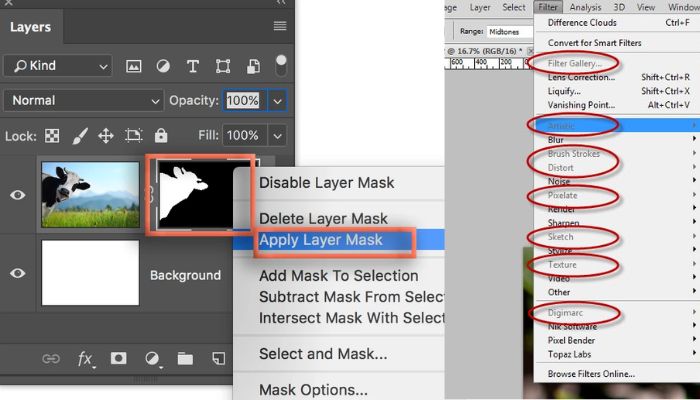
You click to apply a mask, but the option is gray. Nothing happens. You feel stuck. Do not worry. This happens to everyone.
Why it happens
The Apply layer mask greyed out error means you clicked the layer thumbnail instead of the mask thumbnail. Photoshop thinks you want to change the layer itself, not the mask. Masks have their own thumbnail.
How to fix it
- Look at the Layers panel. Your layer has two thumbnails: the layer image (left) and the mask (right).
- Click the right thumbnail (the mask). A white border appears around it.
- Now right‑click the mask. “Apply Layer Mask” is no longer grey.
If it still does not work, your layer might be locked. Double‑click the layer and rename it. That unlocks it.
Pro tip: You rarely need to apply a mask permanently. Keep the mask live. It gives you more flexibility later.
How to Edit a Mask Layer in Photoshop Like a Pro?
Learning how to edit a mask layer in photoshop is just as important as creating one. Editing means changing your hide/show decisions after you made them.
To edit a mask:
- Click the mask thumbnail (white border around it).
- Paint with black to hide more.
- Paint with white to reveal more.
- Paint with gray (soft brush, low opacity) to create a partial blend.
To soften mask edges:
- Select the mask thumbnail.
- Go to Filter > Blur > Gaussian Blur.
- Add a small blur (like 5‑10 pixels). Your edges now look smooth.
To move a mask to another layer:
-
Click and drag the mask thumbnail onto a different layer. Hold Alt (PC) or Option (Mac) to copy it instead of moving.
I edit my masks constantly. No project is perfect on the first try. That is okay. Masks make editing painless.
Photoshop Masking Moving Layer Softness – What Does It Mean?
The phrase photoshop masking moving layer softness sounds technical, but it is simple. It means three things together:
- Moving layer: You shift the layer content without affecting the mask.
- Softness: You use gray or blur on the mask to create a gentle fade.
- Masking: You keep the mask separate from the layer.
Here is how you do it:
- Add a mask to your layer.
- Unlink the mask by clicking the chain icon between the two thumbnails.
- Click the layer thumbnail (not the mask). Use the Move tool (V) to slide the image around. The mask stays in place.
- To add softness, select the mask thumbnail. Use a soft brush (0% hardness) with gray paint. Or apply Gaussian Blur as we did before.
This trick lets you reposition a photo inside a mask window. Great for framing faces or objects.
How to Merge Layer and Mask in Photoshop? (And When to Do It)
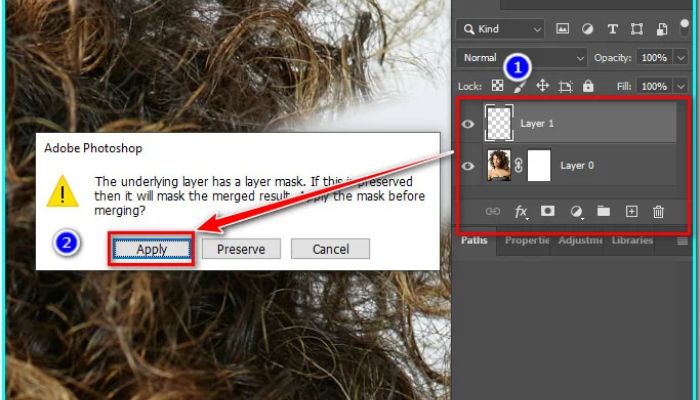
Sometimes you finish a mask and want to combine it with the layer. This is how to merge layer and mask in photoshop. Merging makes the mask permanent, so think twice before you do it.
Steps to merge:
- Right‑click the mask thumbnail.
- Choose “Apply Layer Mask”.
- The mask disappears, and its effect becomes part of the layer pixels.
When should you merge?
- When you export a file for printing and need one flat layer.
- When you use a filter that does not work with masks (some older filters).
- When you send the file to someone who does not know how masks work.
When should you NOT merge?
-
Almost all other times. Keep masks live. You will thank yourself later.
Expert quote: “I have never met a professional who merges masks unless they have to. Live masks are like insurance for your edits.” – Mark T., Photoshop instructor for 12 years.
5 Real Projects Where a Photoshop Layer Mask Saves the Day
Let me give you real examples. These show you how to use Photoshop Layer Masks for beginners in actual work.
Project 1 – Swap a boring sky
You have a nice landscape but a gray sky. Add a new sky photo above your land layer. Add a mask to the sky layer. Paint black on the sky mask over the land area. The old sky shows through. Soft brush on the horizon line makes it look natural.
Project 2 – Remove a background from hair
Select the person (use Select Subject). Add a mask. Zoom in and paint black around the hair edges using a small, soft brush. You keep the fine flyaway hairs because masking does not cut them like the eraser would.
Project 3 – Blend two photos together
Put one photo on top of another. Add a mask to the top photo. Use a big soft brush with black paint on the mask. Paint down the middle. The two photos fade into each other. That is a basic photo composite.
Project 4 – Color pop effect
Duplicate your background layer. Desaturate the top layer (Image > Adjustments > Black & White). Add a mask to the top B&W layer. Paint black on the mask over the object you want in color (like a red rose). The color shows through from the layer below.
Project 5 – Fix overexposed faces
Your subject’s face is too bright. Add a Curves adjustment layer. Drag the curve down to darken the whole photo. Now fill the mask of the Curves layer with black (hide everything). Paint with white on the mask only over the face. Only the face gets darker. The rest stays perfect.
Common Mask Mistakes (And How You Avoid Them)
Even pros make these errors. Now you will skip them.
Mistake 1 – Painting on the layer instead of the mask
You paint black but nothing hides. You forgot to click the mask thumbnail first. Fix: Always look for the white border around the mask.
Mistake 2 – Using a hard brush
Hard edges look fake. Fix: Set brush hardness to 0% (soft brush) for most masking. Use hard brush only for sharp things like buildings or cars.
Mistake 3 – Forgetting you can use gray
Black and white are great. But gray gives you half‑hide. Use a low‑opacity brush (like 30%) to paint gray on the mask. You get a gentle see‑through effect.
Mistake 4 – Masking on a locked background
The Background layer has a lock. You cannot mask it. Fix: Double‑click the Background layer, rename it, and click OK. Now it is a normal layer. Add your mask.
Final Words: Go Mask Everything Today
You now know more than most casual Photoshop users. You understand that a photoshop layer mask is your safety net. You learned how to create a layer mask in photoshop, the Layer mask Photoshop shortcut, and how to fix the Apply layer mask greyed out error. You also know how to edit a mask layer in photoshop, how to merge layer and mask in photoshop, and even the advanced trick of photoshop masking moving layer softness.
Stop erasing. Start masking. Open a photo right now. Add a mask. Paint with black. Then paint with white. See how nothing breaks. That feeling of freedom is what real Photoshop skill feels like.
If you get stuck, come back to this guide. I update it every year with new tips. Now go create something amazing – without fear.
Frequently Asked Questions About Photoshop Layer Masks
Q1: Why is my brush painting red instead of hiding?
You are in Quick Mask mode (press Q to exit). Or you selected the layer thumbnail instead of the mask. Click the mask thumbnail and make sure your foreground color is black.
Q2: Can I use a mask on a group of layers?
Yes. Select the group folder. Click the mask icon. The mask hides or shows the entire group. Great for applying one mask to many layers at once.
Q3: How do I copy a mask from one layer to another?
Hold Alt (PC) or Option (Mac). Drag the mask thumbnail onto another layer. Release. The mask copies over.
Q4: Does a mask increase my file size?
Very slightly. A mask is just a grayscale image inside your file. For most projects, you will not notice any size change. Much smaller than duplicating layers.
Q5: What is the difference between a vector mask and a layer mask?
A photoshop layer mask uses black, white, and gray paint. It works for soft edges. A vector mask uses paths (sharp lines). Use vector masks for logos or shapes. Use layer masks for photos and soft blends.