Learning the basics of night landscape photography will open up a whole universe of photographic possibilities. Combine your new knowledge with solid preparation, the right gear and good field technique, and you’ll able to photograph the Milky Way, star trails, meteor showers, lunar eclipses, the aurora and the landscape by moonlight.
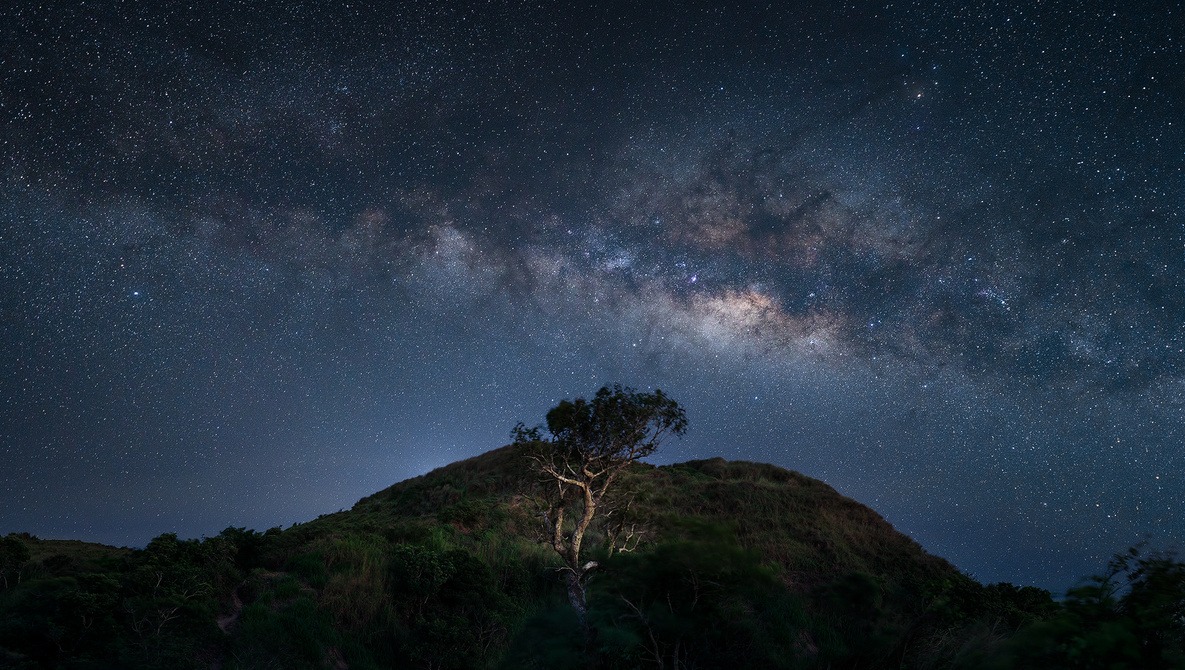
Milky Way near the Joint Trail, Needles District, Canyonlands National Park, Utah. Exposure time for Milky Way images (in locations far from city lights) is 30 seconds at ƒ/2.8 and ISO 6400.
Preparation begins with deciding what type of nighttime landscape photos you want to make, then deciding when and where to go. Regardless of your nocturnal quarry, you’ll have better luck if you get as far away from city lights as possible.
Basic Timing Considerations
The best time to shoot the Milky Way and meteor showers is when the sky is fully dark. The sky reaches its darkest point at astronomical dusk, when the sun is 18 degrees below the horizon, roughly 1.5 to two hours after sunset at the mid-latitudes; it starts to lighten again at astronomical dawn. Both the Milky Way and meteors are quite dim, so you’ll want the darkest possible sky as a background to help these faint objects stand out, which means shooting when the moon is below the horizon.
By contrast, I’ve photographed star trails and the aurora successfully under all phases of the moon. Moonlit landscapes are easiest to shoot under a full moon, and of course the moon is always full during a lunar eclipse. Sun Surveyor for iOS and Android smartphones is my favorite app for data on astronomical dusk and dawn, as well as data on rise and set times and azimuths (compass bearings) for the sun, moon and the galactic center—the most photogenic part of the Milky Way. PhotoPills (iOS and Android) and the Photographer’s Ephemeris (iOS, Android and desktop) are also good sources.
Planning For The Weather
Clear skies are essential for most night landscape photography. The exception is landscapes lit by the full moon, which often benefit from the presence of clouds. My favorite site for weather forecasts is weather.gov. Enter the name of the city closest to your shooting location in the search box at the top of the home page. Scroll down the page to the map, then click on the location of your shoot. The site will display a forecast for an area of roughly 4 square miles centered on the point you clicked. These point forecasts are particularly valuable in mountainous country because the weather in the closest city will be radically different from the weather high on a peak.
Look below the map, and you’ll see a link to an hourly forecast. In addition to useful predictions for temperature, wind speed and chance of precipitation, you’ll find a forecast for the percentage of the sky that will be covered by clouds. ClearDarkSky.com also provides forecasts of sky cover.
Sand dunes and the Sangre de Cristo Range by moonlight, Great Sand Dunes National Park, Colorado. Moonlit landscapes can benefit from the presence of clouds to add interest to the sky.
Essential Gear & Safety
It’s surprisingly chilly standing around next to a camera in the dark. A 40-degree night feels much colder than a 40-degree day because you have no sunshine soaking into your clothing. Be sure to bring plenty of extra clothing, including windproof layers for both your legs and your torso. Snacks will keep your body fueled, and a thermos of hot coffee or tea will taste like the nectar of the gods around 3 a.m.
There is no such thing as gloves that are both thin enough to let you push your camera’s buttons easily and thick enough to keep your fingers toasty in sub-zero weather. My solution is to wear heavy gloves and bring an unsharpened, new pencil with a good eraser. Drill a hole through the leaded end, tie a thin piece of string through the hole, and hang the pencil from your tripod. It’s easy, even with heavy gloves on, to use the eraser end of the pencil to push a button. Use your gloved thumb or forefinger to spin the dials.
Many people find the prospect of night landscape photography intimidating. To dispel those fears, visit the area where you plan to shoot in daylight. Look for hazards that might be less obvious at night, such as cliff edges, old mine shafts or the slippery banks of streams or lakes. Pay close attention to landmarks along the trail leading to your location. Remember that you don’t have eyes in the back of your head. The trail will look very different on the return trip than it did when you were hiking to your location. Turn around periodically during the hike to your location and memorize what key junctions and landmarks will look like when heading back to your car. Bring a companion along on your shoot, and let someone know where you’re going and when you plan to be back.
Bring trekking poles when hiking at night. Becoming a quadruped again will help prevent skinned knees and sprained ankles. Use a headlamp instead of a flashlight so your hands are free for trekking poles or camera gear. Many headlamps offer both white and red LEDs. I always use the brightest white LED for hiking and setting up the shot. When I’m ready to start shooting, I switch to the red LED and turn the brightness way down to let my eyes adapt to the dark. The key to preserving your night vision is to use a very dim light. A bright red light is worse than a dim white light. Full dark adaptation takes about 30 minutes.
The best lens for your first foray into the night is a fast, ultra-wide-angle optic such as a 14mm or 16mm f/2.8, or a wide-angle zoom such as a 14-24mm f/2.8 or 16-35mm f/2.8. Recent cameras have better high-ISO capabilities than older ones. You’ll want a camera body that offers ISOs of at least 6400, preferably higher. A solid tripod is another must for night photography.
Basic Technique For Night Landscape Photography
Your first challenge is focusing the lens at infinity. You’ll probably be shooting wide-open, which means depth of field will be shallow and focus will be critical. Turn off auto-focus completely, even if you use rear-button focus. It’s way too easy to accidentally hit that button with a gloved thumb and not notice that you’ve ruined your focus.
Aurora over Tombstone Mountain, Tombstone Territorial Park, Yukon Territory, Canada. A basic starting point for aurora photos is a 10-second exposure, but the right exposure time can vary significantly, so trial and error is required.
With few exceptions, you can’t simply rack the lens to the physical stop because most modern lenses allow you to focus past infinity. Nor can you simply set the index mark on the lens to the infinity mark and assume you’re critically focused. The easiest solution is to focus the lens at infinity in daylight, then tape the lens with gaffer tape, which doesn’t leave a residue. If you must focus at night, point the lens at a bright star or planet, enlarge the view to about 10x (turn on Live View if shooting with a DSLR to do this) and manually focus on the star. Then shoot a test frame, being sure to include a bit of skyline in the frame. A slightly out-of-focus star just looks like a bigger star, but an out-of-focus skyline will be obviously blurry. Then tape the lens and test again.
Exposure at night is a matter of (educated) guess-and-check. Your meter will be useless; use manual exposure mode and ignore the meter. For most night images, you’ll want to keep the stars reasonably round, which means your shutter speed must be short enough to prevent the stars from becoming streaks due to the rotation of the earth.
One convenient way to calculate the maximum shutter speed is the “500 rule:” divide 500 by the focal length of the lens to get the maximum shutter speed. For example, if you are using a 20mm lens, you would divide 500 by 20 and get 25 seconds—the maximum shutter speed to keep stars reasonably round. Note that this rule is a compromise between two goals: keeping stars round and keeping noise under control. If you enlarge the image to 100 percent, you will see that the stars have made short streaks. You can use a tighter standard for star roundness (for example, use 200 instead of 500 when dividing by the focal length) and compensate for the shorter shutter speed by using a higher ISO, but the price will be more noise.
Exposure Settings For Night Landscape Photography
In a dark-sky location, far from city lights, the correct exposure for the Milky Way is 30 seconds, ƒ/2.8, ISO 6400. You’ll need a 16mm or wider lens to use that long of a shutter speed without obvious star trails. Those settings will give you a correctly exposed Milky Way straight out of the camera. Some recent cameras may give slightly better results if you use a much lower ISO, such as 1600, then correct the exposure in processing software. These cameras are said to be ISO-invariant. Test your own gear to see what gives you the best results.
My standard Milky Way exposure will render the land very dark. To get better detail in the land, I usually shoot two frames, exposing one for sky, the other for land, then put the two frames together in Photoshop. As a rule of thumb, the correct exposure for the land in a Milky Way image (assuming no snow on the ground) is about two stops brighter than the correct sky exposure, or about two minutes, ƒ/2.8, ISO 6400.
An intervalometer will let you set exposures longer than 30 seconds. This is much more convenient than using bulb mode and timing your exposures with your watch or phone. Using an intervalometer also allows you to change exposure without touching the camera and potentially causing the tripod to move in between exposures, which would prevent the images from aligning perfectly.