Canon released two versions of its high-end mirrorless camera, the EOS R5 and R6. While the 20-megapixel R6 is aimed to be a general-purpose tool, the Canon EOS R5 is much more specialized thanks to its high-resolution 45-megapixel sensor that is capable of shooting 8K video. As a result, it is a fairly sophisticated camera with a complex menu system and controls. In this article, I am going to share my recommended camera settings for the Camon EOS R5, which will hopefully make it easy for our readers to get started with this camera.
It is important to point out that while the settings below work great for my needs, there are other ways to set up and configure the camera.
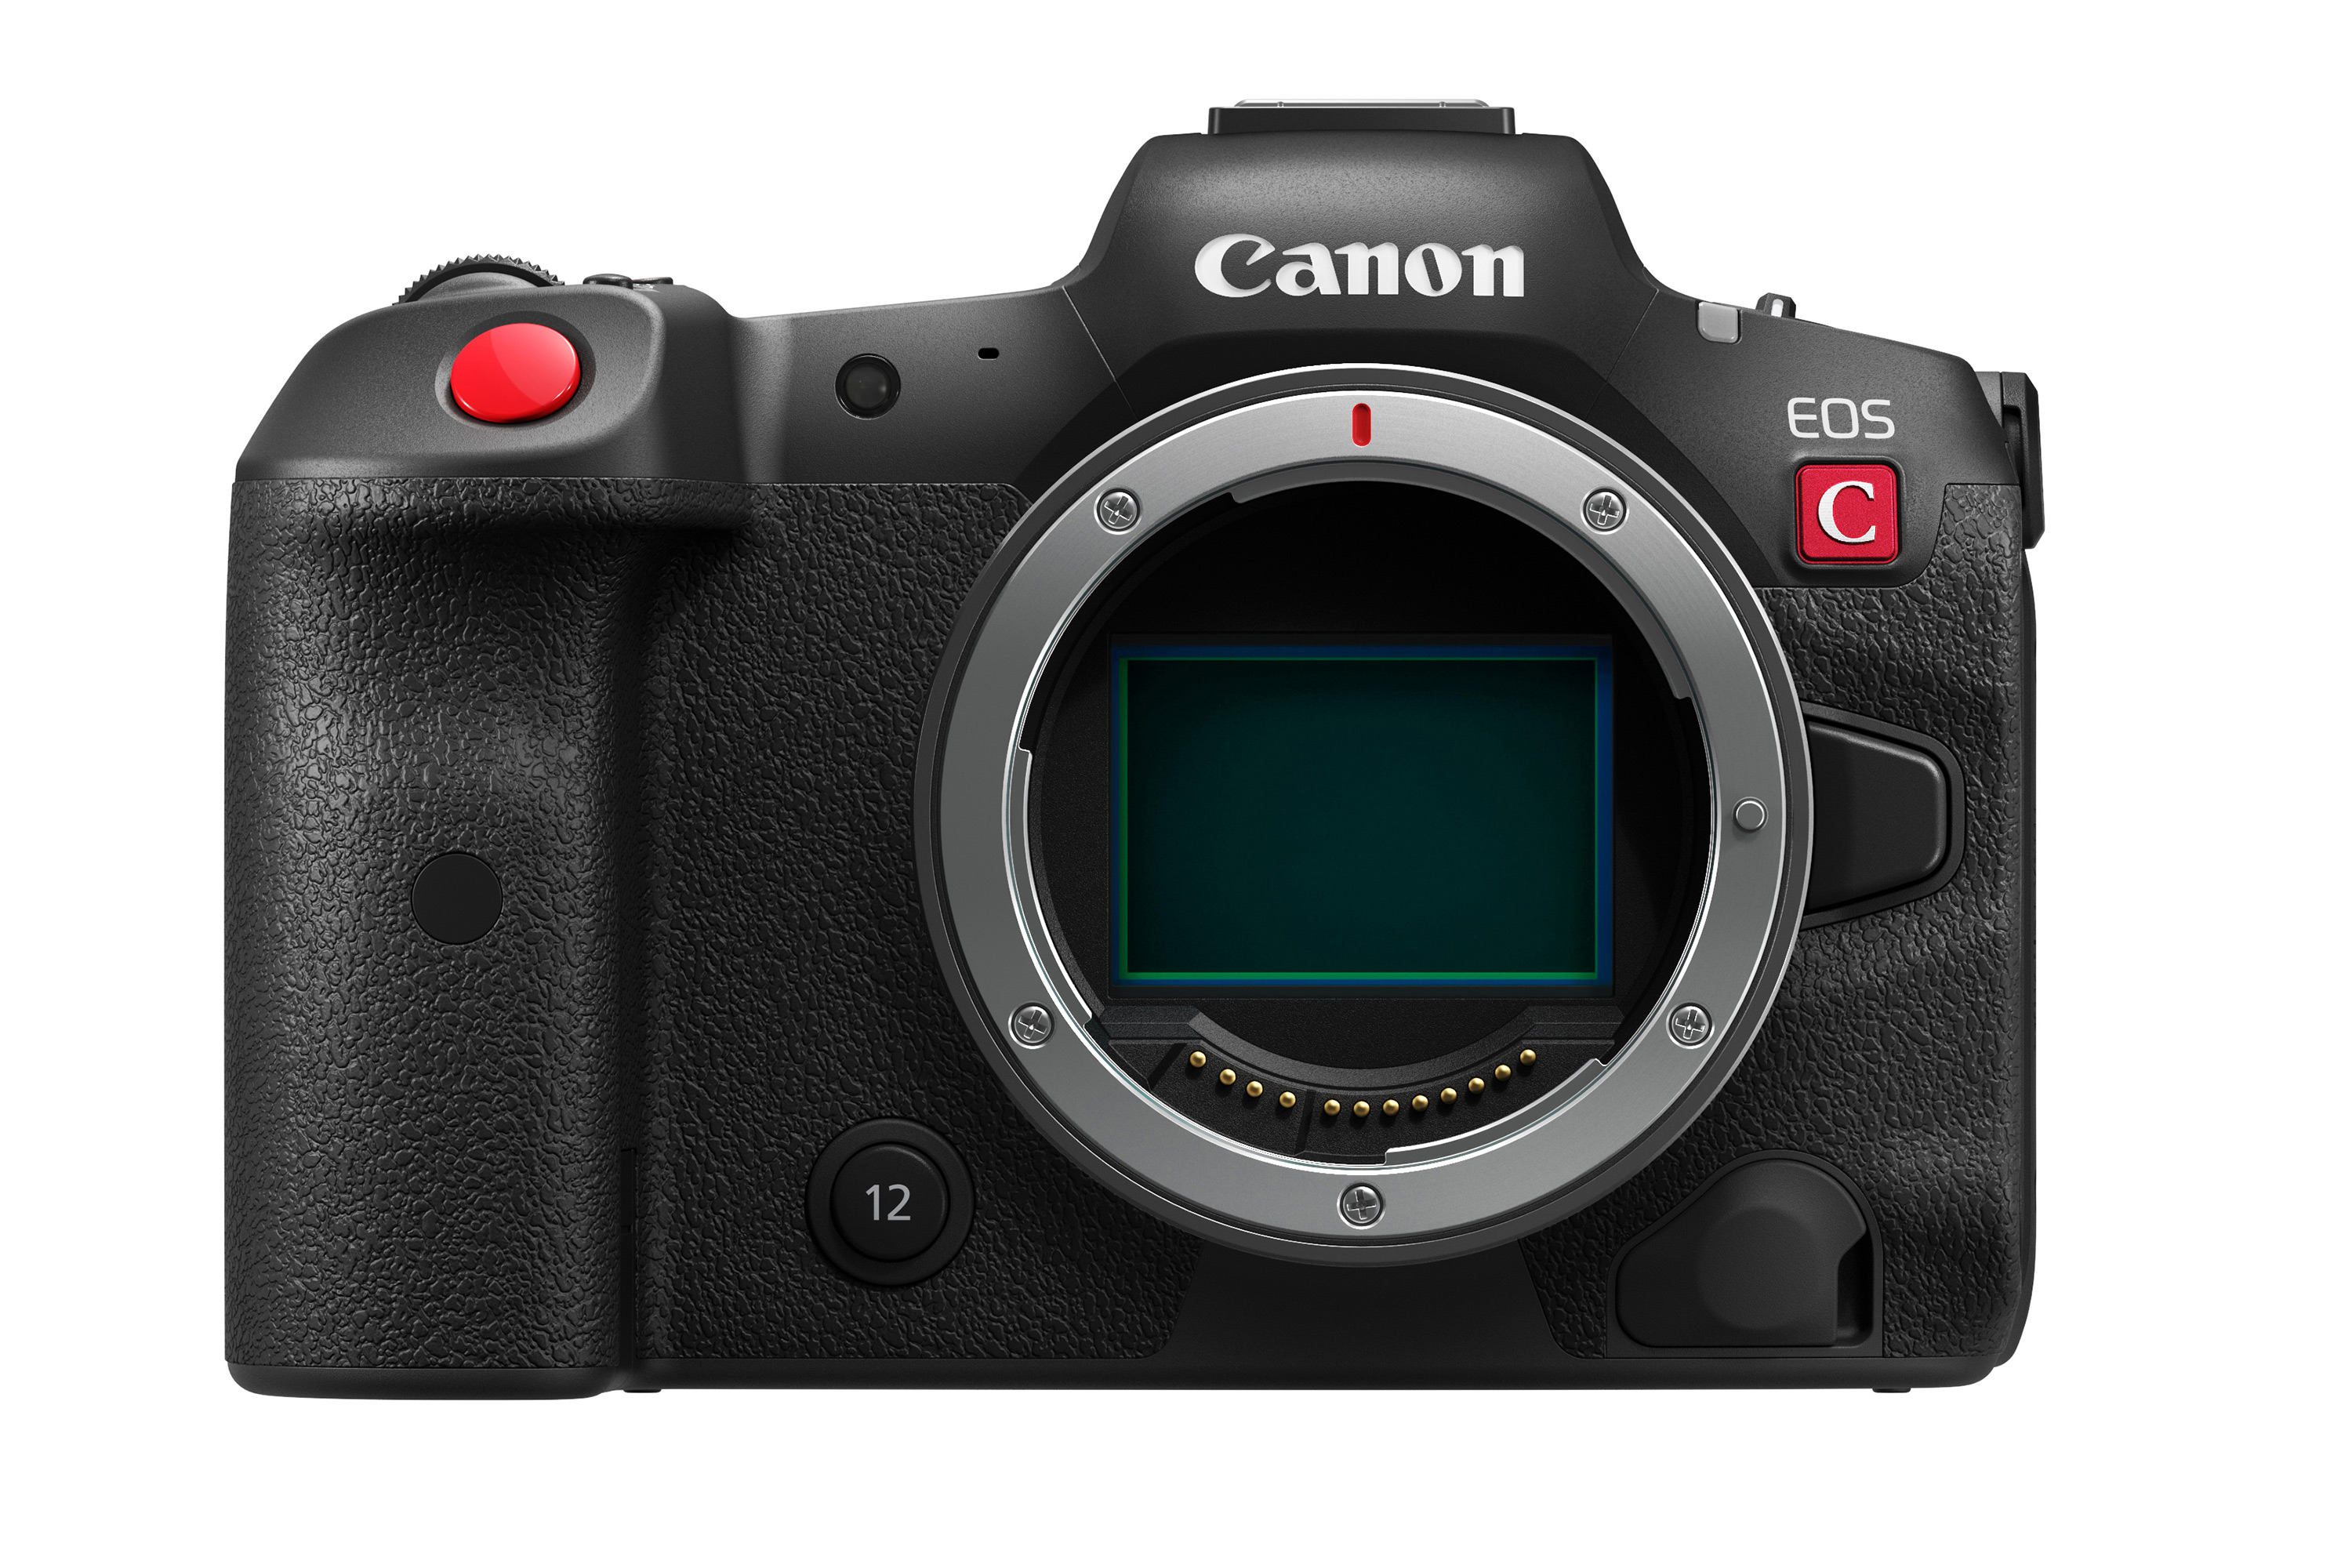
Before we delve into the camera menu, let’s first go over all the exterior controls. The Canon EOS R5 has many menu options, but there are some things that you can only do via specific buttons and controls.
Top Buttons and Controls
Just like most other Canon DSLRs, the EOS R5 has a very simple and uncluttered front, with a single programmable button that is by default used for exposure preview. The top of the camera, however, has a number of dials and function buttons that make it easy to switch between different camera modes and settings.
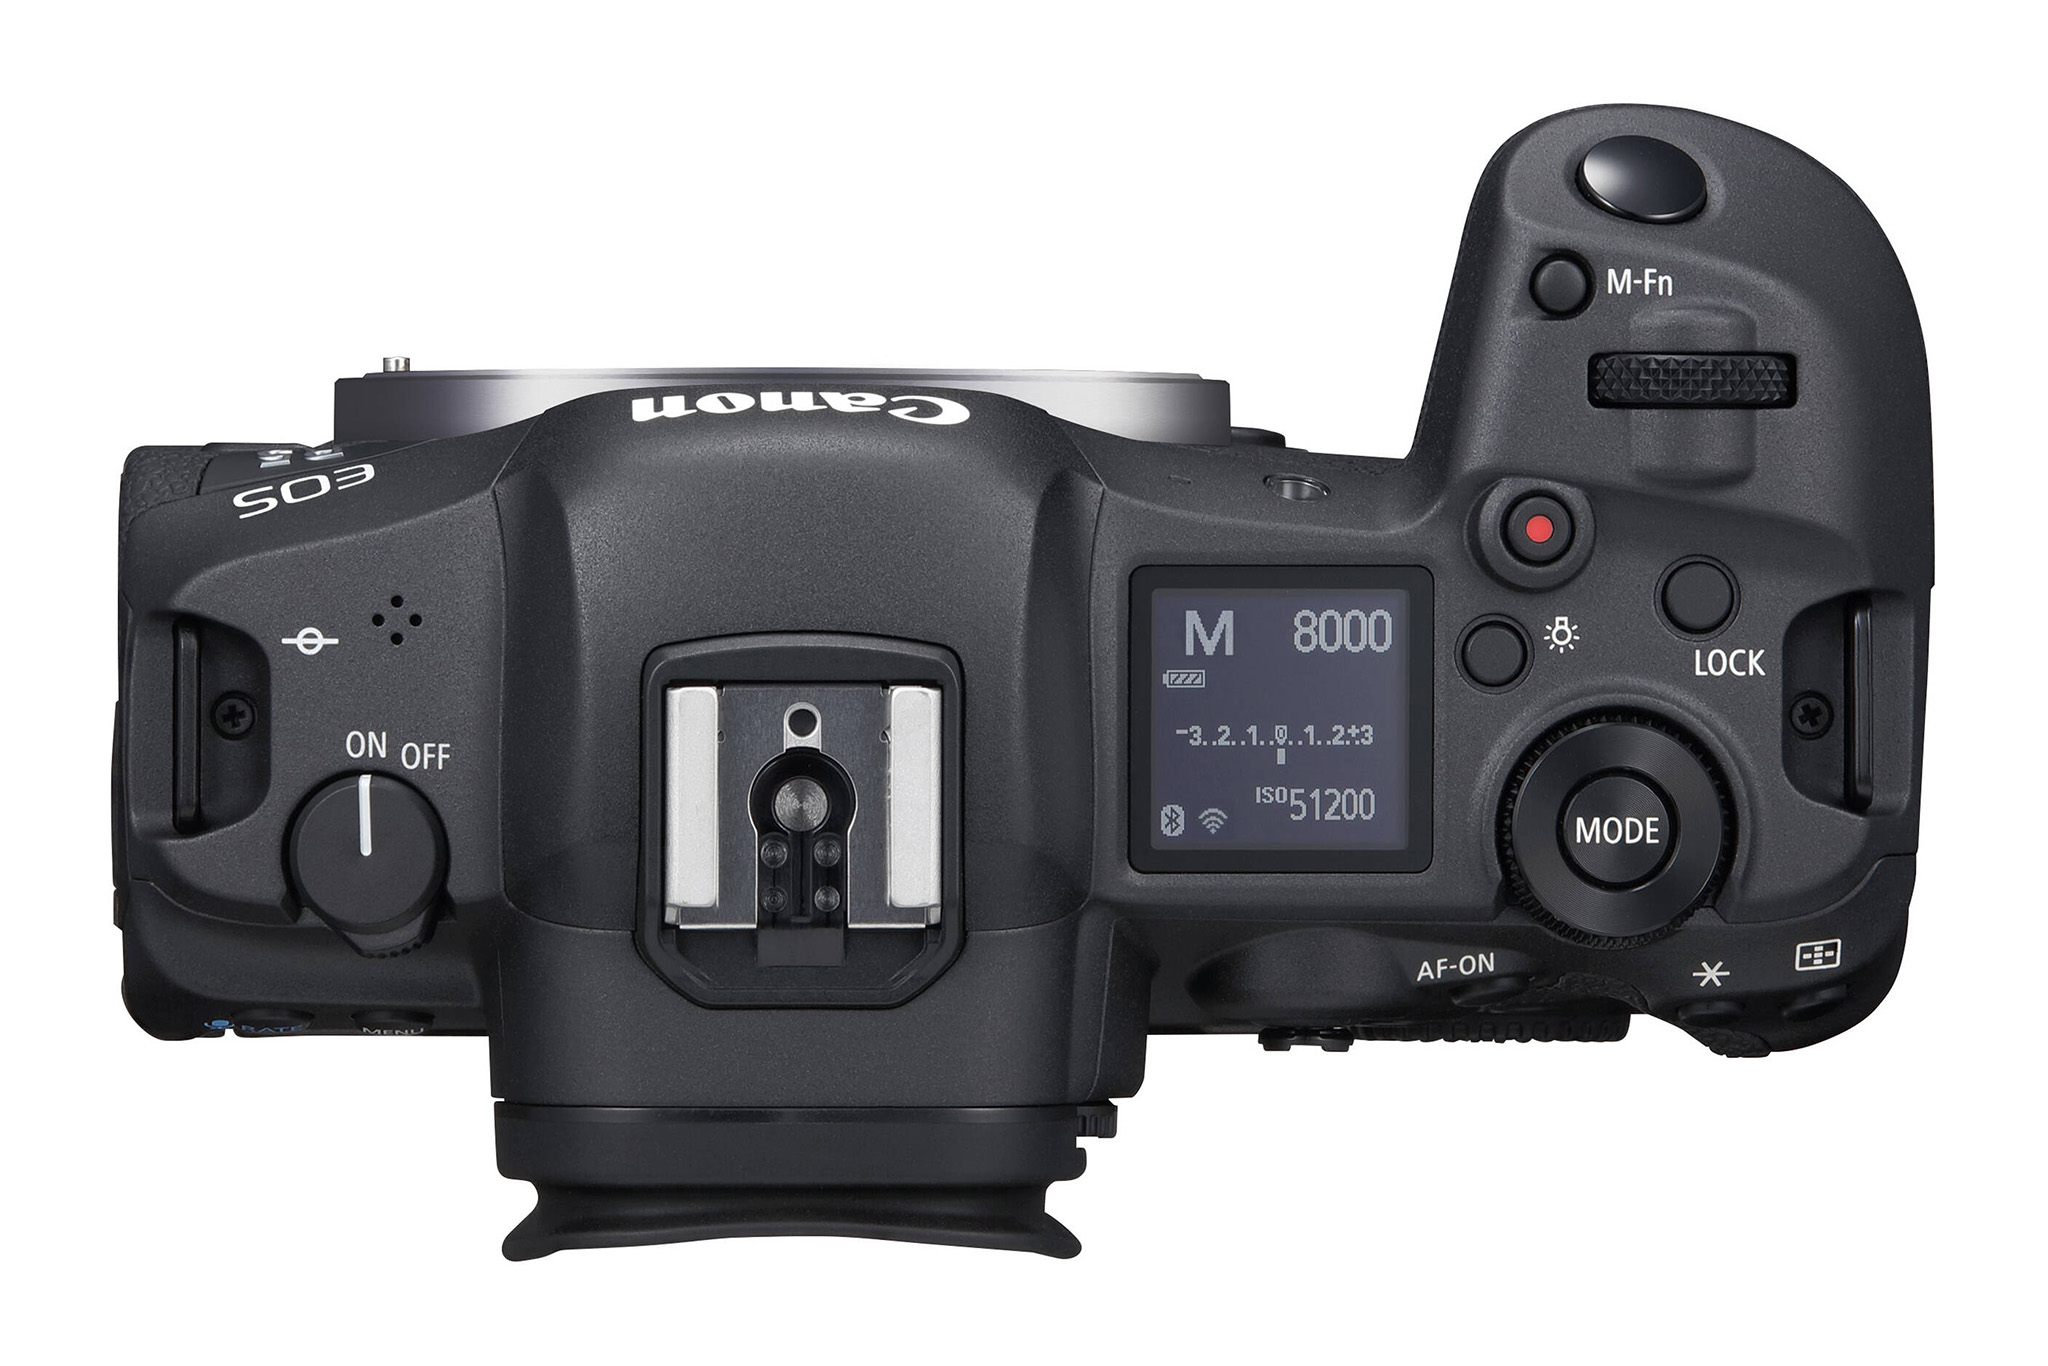
Here they are, from left to right:
- Power On / Off Switch: self-explanatory.
- Shutter Release Button: by default, half-pressing the shutter release activates autofocus, while fully pressing it takes a picture. You can change the behavior to disable autofocus on half-press in order to use back-button focusing (explained further down in the article).
- Multi-Function (M-Fn) Button: this button is used to quickly change important camera settings, such as ISO, drive mode, AF operation, white balance, and exposure compensation (items customizable via menu).
- Vertical Dial: used for changing shutter speed or aperture, depending on which camera mode you are in. Also used for changing specific button and quick menu settings.
- Video Record Button: for starting and stopping movie capture.
- Lock Button: used for locking camera controls (customizable via menu).
- Top LCD Info Switching / Illumination Button: for illuminating the top LCD screen in dark environments and for switching top LCD information.
- Mode Button / Horizontal Dial: the mode button along with the horizontal dial by default are used for changing camera modes, which display on the top LCD. These controls are also used for changing some camera settings in the menu.
Rear Buttons
The rear of the Canon EOS R5 has a bunch of buttons and dials that serve particular needs. Let’s go over these in detail.
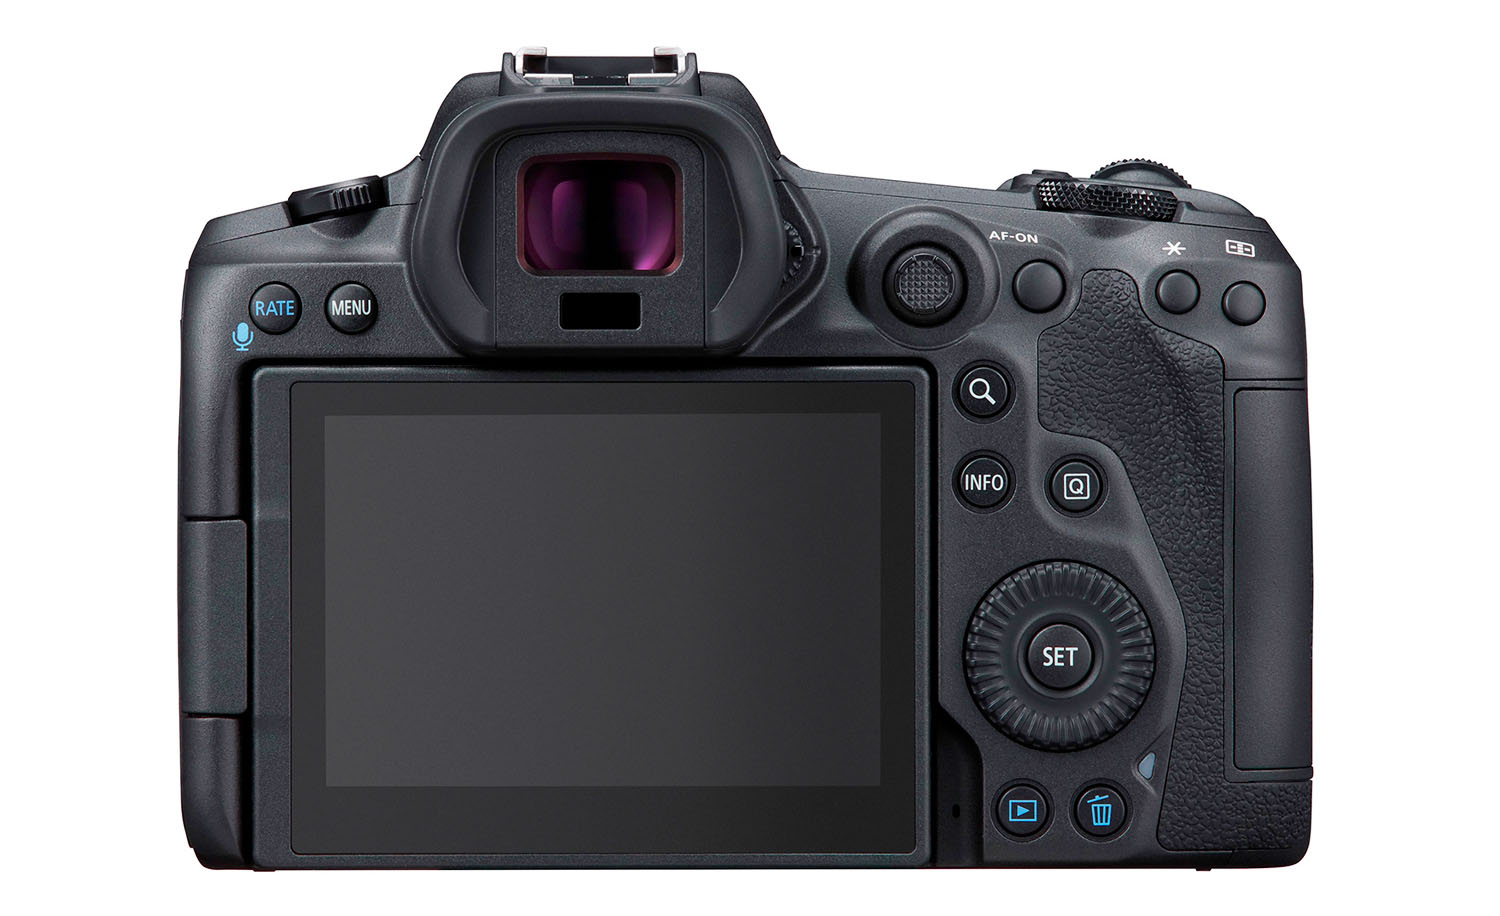
To the left of the electronic viewfinder (EVF), you will find two buttons, while to the right of the EVF there are a total of 13 buttons and dials, as explained in detail below:
- Rate / Voice Memo Button: used to rank images from 1 to 5 when viewing images, or for recording voice memos.
- Menu Button: used to access the camera menu.
- Joystick: this is what you will be using to move focus points and reset them. The joystick can also be used for navigating the camera menu, as well as navigating through a played-back image while zoomed in.
- AF-ON Button: used to engage autofocus. This is the button you will be pressing if you want to set up back-button focusing.
- AE Lock Button (star label): used to the exposure, which can be useful for keeping the exposure consistent between shots or when shooting panoramas.
- AF Point Button (rectangle with five dots label): used for switching between different autofocus modes, as well as for moving the focus point. By default, the rear rotary dial will move focus points vertically, while the top vertical dial will move focus points horizontally. Since the joystick is so much better for moving focus points, I set up my vertical dial so that it allows quickly moving between autofocus modes, instead of having to press the M-Fn button (explained in the menu section below).
- Magnifying Glass Button: used for zooming into the image when taking pictures, or when viewing images. I set up mine to zoom to 100% (actual pixels) when I press this button, so that I can instantly see if my captured image is sharp or not. It is also very useful to be able to zoom in to 100% view in the viewfinder when capturing images, to ensure that your subject is in focus.
Shoot Menu 1
Here are the settings I use for Camera Menu 1, with explanations:
- Image Quality: RAW – I always recommend shooting in RAW format. As explained in my RAW versus JPEG article, there is a huge difference between RAW and JPEG. With RAW, you also do not have to worry about other camera settings such as picture styles and white balance, because you can modify those in post-processing.
- Dual Pixel RAW: Disable. Read about this feature here, and only enable it if you actually plan on using the Dual Pixel RAW feature.
- Cropping/aspect ratio: Full. Only change this setting if you want to shoot in a particular aspect ratio. The EOS R5 provides the following aspect ratios: Full (3:2), 1:1, 4:3 and 16:9. You can also shoot in 1.6x crop mode.
Shoot Menu 2
- Expo.comp./AEB: 0 – this is for setting exposure compensation or exposure bracketing. I would not bother with setting exposure compensation through the menu, since you can do it much quicker with the large rotary dial on the back of the camera.
- ISO speed settings:
- ISO speed: I personally like to use the Auto ISO feature, since it works really well for automatically adjusting my shutter speed in different lighting environments.
- ISO speed range: 100-H – this setting affects what you are able to see when changing ISO. I want to keep the entire range for ISO selection, so I leave it at 100-H range.
- Auto range: 100-12800 – now this setting is particularly useful when shooting in “Auto ISO” mode. I am typically not comfortable with noise above ISO 12800 on the EOS R6, so I keep the maximum range limited to 12800.
- Min. shutter spd.: Auto – with the “Auto” setting, the camera will automatically adjust the shutter speed of the camera to the reciprocal rule. For steady hands and good posture, this might be sufficient. However, if you have shaky hands, then the default “Auto” setting might not do justice to keep you away from camera shake. If you notice blur in your images, you can move the slider under “Auto” to the right towards “Faster” with the top dial, which will use a shutter speed that’s twice as fast.
Shoot Menu 3
- White balance: AWB – Just like ALO, white balance setting also does not matter, as you can adjust it later in post-processing.
- Custom White Balance – unless you want to set custom white balance with a gray card, skip this setting.
- WB Shift/Bkt.: 0,0/±0 – don’t mess with this unless you know what you are doing.
- Color space: Adobe RGB – although color space does not matter for RAW images, Adobe RGB gives a slightly more accurate histogram to determine the correct exposure (since the camera shows histogram based on camera-rendered JPEG image, even if you shoot exclusively in RAW).
- Picture Style: Standard – does not matter when shooting in RAW. I set mine to “Standard” and use the Standard camera profile in Lightroom for consistency. For more details about this, check out my article “how to get accurate Canon colors“.
- Clarity: 0 – does not matter when shooting in RAW.
- Lens aberration correction: I disable all lens corrections because they only apply to JPEG images. If you are a JPEG shooter, leaving these on will reduce vignetting, chromatic aberration, distortion and diffraction issues in your images.
- Peripheral illum corr: Off
- Distortion correction: Off
- Digital Lens Optimizer: Off
- Chromatic aberr corr: Off
- Diffraction correction: Off
Shoot Menu 4
- Long exp. noise reduction: Auto – will reduce noise when doing long exposure photography.
- High ISO speed NR: OFF – another one I leave off, as it only affects JPEG images.
- Dust Delete Data – this is used for removing dust in images if you have dust particles on the image sensor. I never use this feature, since I prefer cleaning the camera sensor instead.
Shoot Menu 5
- Multiple exposure: Disable – this is used for creative photography when stacking photos on top of each other.
- HDR Mode: Off – only relevant when shooting in JPEG and wanting to make HDR images.
- Focus bracketing: Disable – use this menu setting to perform focus stacking.
Shoot Menu 6
- Interval timer: Disable – built-in intervalometer for shooting timelapse sequences.
- Bulb timer: Disable – disabled in all normal modes, so you can only activate it when you select “B” camera mode. With the bulb timer feature, you can set exposure lengths longer than 30 seconds. This is particularly useful when doing long exposure photography and when working with neutral density filters.
- Shutter mode: Elec. 1st-curtain – allows changing the shutter mode.
- Release shutter without card: OFF – you do not want the camera to fire without a memory card, in case you forget to insert one.
Shoot Menu 7
- IS (Image Stabilizer) mode: allows turning in-body image stabilization on or off. If your lens has a Stabilizer switch, the menu item disappears.
- Touch Shutter: Disable – allows touching the rear LCD to take a picture.
- Image review: 2 sec, disable. After you take an image, it will be shown on the rear LCD for 2 seconds. I disable viewfinder review, so that I can continue shooting without any distractions.
- High speed display: when shooting in high speed drive mode and continuous / Servo AF operation, you can enable this feature to make the viewfinder more responsive when photographing fast-moving subjects.
- Metering timer: 4 sec – I prefer using a shorter value to preserve the battery.
- Expo. simulation: Enable – by default, the camera LCD / EVF will simulate how bright or dark the image will look when captured. If you disable this, the LCD / EVF will always be boosted.
- Shooting info. disp.: used to increase and decrease the amount of information when pressing the INFO button:
- Screen info. settings: 1, 3 and 4 are enabled. I disable 2 and 5 to reduce the clutter.
- VF info/toggle settings: 1 and 3 are enabled.
- VF vertical display: On
- Grid display: 3×3
- Histogram disp: RGB
- Focus distance disp: In MF mode
Shoot Menu 8
- VF display format: Display 1
- Disp. performance: Power saving. I recommend changing to Smooth when shooting fast action.
Autofocus Menu 1
- AF operation: SERVO AF – allows switching between One-Shot AF and Servo AF.
- AF method: Face AF + Tracking – allows switching between different autofocus modes.
- Subject to detect: People – switch to Animals when photographing animals.
- Eye detection: Enable, self-explanatory.
- Continuous AF: Disable. Enabling this will automatically engage autofocus when the subject moves. I prefer engaging autofocus with a button, so I leave this disabled to preserve battery life.
- Touch & drag AF settings: a very cool feature that allows you to use the rear LCD to move the focus point when looking through the EVF. I leave this enabled, with relative positioning method and right active touch area.
Autofocus Menu 2
- MF peaking settings: default, used for focus peaking when shooting in manual focus. If you want to enable focus peaking, make sure to set the right level and color.
- Focus guide: On – shows a focus guide when focusing manually.
- AF-assist beam firing: On – allow the use of the AF assist beam in front of the camera when shooting in low light situations.
Autofocus Menu 3
Here, you will find 4 Cases or “templates” to use in different situations. These cases are basically four different combinations of two settings: “Tracking sensitivity” and “Acceleration/deceleration tracking”:
- Case 1: Versatile multi purpose setting – works great for everyday shooting.
- Case 2: Continue to track subjects, ignoring possible obstacles – if you need to actively track a subject like a bird while ignoring trees and other objects in the scene.
- Case 3: Instantly focus on subjects suddenly entering AF points – if there are many birds in the frame and you want to focus on the closest one.
- Case 4: For subjects that accelerate or decelerate quickly – when camera to subject distance changes fast, such as a bird flying towards you.
- Auto: Tracking automatically adapts to subject movement.
Although these cases can be very useful in different situations, I found Case 1 and “Auto” to work best as the default setting.
The nice thing about the above cases, is that you can actually fine-tune each one of them to suit your needs by modifying the two setting parameters.