
The Canon 5D Mark IV is a highly sophisticated camera, and that means it has a very complex menu system with numerous options. Even advanced photographers may find it tricky to set the Canon 5D IV correctly at first, so we decided to share our recommended camera settings to give you a place to start. Please keep in mind that the settings below are simply our personal recommendations, and they certainly are not the only way to properly setup and configure this camera.
Before going into the camera menu, let’s first get started on the exterior controls. The Canon 5D Mark IV has a lot of menu options, but there are some things that you can only control with the external controls. In addition, even if menu settings provide options to change particular settings, using external buttons / controls is simply faster and more intuitive.
Autofocus, Drive Modes and Metering
Just like most other Canon DSLRs, the 5D Mark IV has a very simple and uncluttered front, with a single programmable button that is by default used for exposure preview. The top of the camera, however, has a number of dual function buttons that make it easy and convenient to switch between different camera modes and settings. Here they are, to the right of the flash hotshoe:
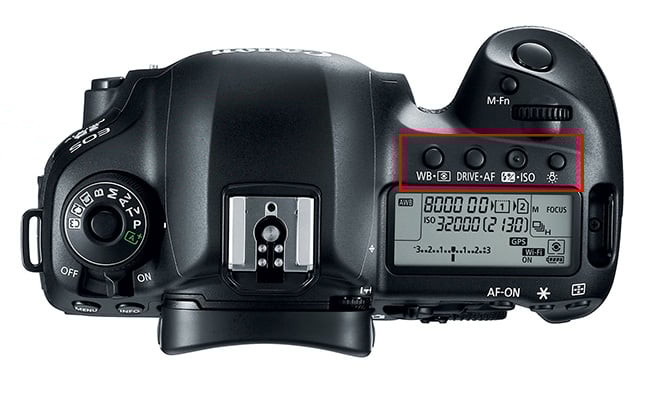
Let’s go through each of these one by one:
- The first dual function button is used for setting up either White Balance or Metering Mode. Press this button once and you can use the rotary dial on the back of the camera to toggle between different white balance presets, such as AWB (Auto White Balance), Daylight, Shade, Cloudy, Tungsten Light, White Fluorescent Light, Flash, Custom and Color Temp in Kelvin. I won’t go over these in detail, as you can read about these in my What is White Balance? and John Bosley’s excellent Understanding White Balance articles. You can also change white balance using the camera menu, as shown below. The second function of the button lets you switch between different metering modes by rotating the dial on top of the camera. The metering modes you will see are: Evaluative, Partial, Spot and Center-Weighted Average. Once again, I won’t go over each mode in detail, as you can read my Camera Metering Modes article, where each metering mode is covered in detail. If you do not know where to start, keep your metering mode in the default “Evaluative” mode, which is the one that looks like an eye. Metering can only be set through this button and there is no place to change it in the camera menu.
- The second “DRIVE * AF” button is used for setting different drive and autofocus modes. Once again, you will need to rotate the rear dial to switch between different drive modes, while the top rotary dial is used to switch between autofocus modes. When you going through the drive modes, you will see the following options:
- Single Shooting – pressing the shutter release button will only fire one shot. If you continue to hold, nothing will happen.
- High-Speed Continuous Shooting – pressing and holding the shutter release button will continuously fire the camera at a speed of 7 frames per second.
- Low-Speed Continuous Shooting – pressing and holding the shutter release button will continuously fire the camera at a lower speed of approximately 3 frames per second.
- Silent Single Shooting – similar to the first setting, but the mirror is raised slower for less noise.
- Silent Continuous Shooting – similar to the second setting, but the mirror is raised slower for less noise when firing continuously.
- 10 second Self-Timer / Remote Control – after you press the shutter release button or engage a remote trigger, the camera waits for 10 seconds before taking a picture.
- 2 second Self-Timer / Remote Control – similar as above, except the wait time is reduced to 2 seconds.
Depending on what you are planning to shoot, you will probably toggle the most between Single Shooting and High Speed Continuous Shooting modes. By default, I keep mine at Single Shooting mode, but if I need to capture fast action (such as wildlife or sports), I switch to High Speed Continuous Shooting mode.
When toggling between different autofocus (AF) modes, you will see the following choices:
- One Shot – is used only for stationary subjects that do not move. When you half-press the shutter button, autofocus locks on the subject and if the subject moves, the focus will not change, resulting in a blurry picture. Only use this mode for photographing stationary subjects (landscapes, architecture, etc).
- AI Focus – this mode is a combination of both One Shot and AI Servo (below) modes in one setting. The camera evaluates the subject/scene and automatically switches between the above two modes depending on what you are photographing.
- AI Servo – this setting is used for photographing moving subjects. When you half-press the shutter button and your subject moves, the camera will re-acquire focus. I usually keep my camera in AI Servo autofocus mode when photographing people, especially my kids running around.
For most stationary subjects, keeping the camera on AI Focus mode works really well. However, if you are planning to shoot a moving subject, then the AI Servo mode is what you want to switch to.
The above is a quick summary, but if you are looking for detailed information on autofocus modes, see my DSLR autofocus modes article.
- The next button is used to dial Flash Exposure Compensation and change ISO. If you shoot flash, rotating the rear dial will allow you to either increase or decrease flash power. Changing ISO is accomplished with the top dial and you can toggle between Auto ISO to regular ISO levels like 100, 200, 400, etc. all the way to ISO 102,400 (Hi 2). Personally, I am a fan of the Auto ISO setting, as it automatically selects the right ISO for me depending on the brightness of the scene. If you are a beginner, I recommend using the Auto ISO setting, the behavior of which can be fine-tuned in the camera menu (as explained in detail further down below).
- The last button is used to light up the top LCD of the camera, which can be useful when photographing in the dark.
There is an extra button called “M-Fn” on the top of the camera right next to the top dial. By default, this one is set to “FEL” (Flash Exposure Lock), which I personally find to be rather useless on the 5D Mark IV. I went ahead and changed mine to “AE lock (hold)” for situations when I need to lock and hold my exposure. This can be achieved by going to Menu -> Camera Menu 3 (Camera Icon with dots) -> Custom Controls -> M-Fn -> AE lock (hold). The Custom Controls are explained further down below.
Camera Shooting Mode Dial
On the top left side of the camera you will find a camera shooting mode dial (often referred to as the “PASM” dial). I have my dial set to “Av” (Aperture Priority Mode) 90% of the time, because the camera does a great job in giving me good exposures. Once you get to know the camera better, I would recommend to explore the “C1” – “C3” settings (more on this below under Setup Menu), because they could save you a lot of time when switching between different shooting environments (say when switching between photographing sports / wildlife and landscapes).

Some situations, such as when photographing panoramas or using off-camera flash call for using the Manual (M) mode, but I would only recommend to use this mode when you get comfortable with the exposure triangle. I personally favor Manual mode when photographing birds to keep my shutter speed the same, while letting the camera control ISO via Auto ISO.
Back Buttons
The Canon 5D Mark IV has a number of buttons on the back of the camera that also serve particular needs. To the top right of the camera, you can find three buttons: AF-ON, AE Lock (Asterisk) and AF Area Mode. The AF-ON button can be used in conjunction with the Custom Functions (see below) for “back-button AF” that you can use for the focusing and recomposing.
The AE Lock button is used to lock the exposure, which can be useful for keeping the exposure consistent between shots or when using the above-mentioned focus and recompose technique.
The last AF Area Mode button is used for selecting a particular focus point. When you press this button once, the top LCD will display “SEL [ ]”, which allows switching between different focus points in the viewfinder, or switching to dynamic focusing / automatic selection (with all focus points activated). If you look through the viewfinder and rotate the rear dial, you will see the focus points go vertically from top to bottom and vice versa. If you rotate the top dial, the focus points will switch horizontally from left to right and vice versa. Personally, I do not like the fact that I have to press a button to activate focus points, so I always use the multi-controller instead, as explained in detail below.
There is one more button on the back of the camera that can be quite handy for making quick adjustments to the camera and that’s the “Q” button that is located to the right of the magnifying glass and playback buttons. I love this button, because it serves as a shortcut to get to the most important settings without having to dig through the many menu items. It gives you access to the exposure triangle, exposure and flash exposure compensation, custom controls, picture styles, white balance + white balance shift, auto lighting optimizer, AF operation, metering mode, drive mode and image size / quality settings. So this button is a great shortcut to seeing a summary of all settings on the camera that are currently applied. From here, you can override the top buttons easily by simply using the multi-controller on the back of the camera. If you would like to see this menu permanently on the screen, you can press the “Info.” button on the top left side (toggle it until you see the same menu). The only downside of keeping it permanently on the screen, is that you will be using the battery more due to LCD being active all the time.
Let’s go through the camera Menu settings now.
Shoot Menu 1
Here are the settings I use for Camera Menu 1, with explanations:
- Image Quality: RAW – I always recommend to shoot in RAW format. As explained in my RAW versus JPEG article, there is a huge difference between RAW and JPEG. With RAW, you also do not have to worry about other camera settings such as picture styles, white balance and lighting optimizer, because you can modify those in post-processing.
- Dual Pixel RAW: this is a new feature on the Canon 5D Mark IV that allows pixel-level adjustment when enabled. You can read more about this feature in this article. I would keep this disabled, since the file size will pretty much double – only use Dual Pixel RAW when you need it!
- Image review: 2 sec – I leave this at 2 seconds. After you take an image, it will be shown on the rear LCD for 2 seconds. If you want to preserve the battery life, you can turn this off as well.
- Beep: Disable – leave this disabled, since the camera will beep every time focus is achieved, which is annoying.
- Release shutter without card: OFF – you do not want the camera to fire without a memory card, in case you forget to insert one.
- Lens aberration correction: I disable all corrections, because they only apply to JPEG images. If you are a JPEG shooter, leaving these on will reduce vignetting, chromatic aberration and distortion issues in your images.
- Peripheral illum corr: Off
- Distortion correction: Off
- Digital Lens Optimizer: Off
- Chromatic aberr corr: Off
- Diffraction correction: Off
- External Speedlite control: Only applies when you photograph with flash
- Flash firing: Enable
- E-TTL II meter.: Evaluative
- Flash sync. speed in Av mode: AUTO
- Flash function settings (only available when external flash unit is mounted)
- Flash C.Fn settings (only available when external flash unit is mounted)
Shoot Menu 2
- Expo.comp./AEB: 0 – this is for setting exposure compensation or exposure bracketing. I would not bother with setting exposure compensation through the menu, since you can do it much quicker with the large rotary dial on the back of the camera
- ISO speed settings:
- ISO speed: Auto – as explained earlier, I like to use the Auto ISO feature, since I do not have to worry about the exposure.
- Range for stills: 100-H2 – this setting affects what you are able to see when changing ISO through the ISO button or through the Quick menu. I want to keep the entire range for ISO selection, so I leave it at 100-H2 range.
- Auto range: 100-6400 – now this setting is particularly useful when shooting in “Auto ISO” mode. I am not comfortable with noise above ISO 6400 on the 5D Mark IV, so I keep the maximum range limited to ISO 6400. In some situations, I might push my maximum limit to 12800.
- Min. shutter spd.: Auto – with the “Auto” setting, the camera will automatically adjust the shutter speed of the camera to the reciprocal rule. For steady hands and good posture, this might be sufficient. However, if you have shaky hands, then the default “Auto” setting might not do justice to keep you away from camera shake. If you notice blur in your images, you can move the slider under “Auto” to the right towards “Faster” with the top dial, which will make the shutter speed value twice as fast. For example, if at 35mm focal length you are getting 1/50 shutter speed, moving to Auto(1) will speed up the shutter speed to 1/100.
- Auto Lighting Optimizer: OFF – ALO settings are only applicable to JPEG images and I usually keep them turned off.
- White balance: AWB – Just like ALO, white balance setting also does not matter, as you can adjust it later in post-processing.
- Custom White Balance – unless you want to set custom white balance with a gray card, skip this setting.
- WB Shift/Bkt.: 0,0/±0 – don’t mess with this unless you know what you are doing.
- Color space: Adobe RGB – although color space does not matter for RAW images, Adobe RGB gives a slightly more accurate histogram to determine the correct exposure (since the camera shows histogram based on camera-rendered JPEG image, even if you shoot exclusively in RAW).
Shoot Menu 3
- Picture Style: Standard – does not matter for shooting RAW images. I set mine to “Standard” and use the Standard camera profile in Lightroom for consistency. For more details about this, check out my article “how to get accurate Canon colors.”
- Long exp. noise reduction: OFF – I leave this off, but you might want to turn it on if you are planning to shoot very long exposures such as when doing astrophotography.
- High ISO speed NR: OFF – another one I leave off, as it only affects JPEG images.
- Highlight tone priority: OFF – unlike Auto Lighting Optimizer (ALO), Highlight tone priority does affect RAW data, since it actually underexposes an image to recover highlights. Unless you shoot JPEG, instead of letting the camera underexpose images with HTP to keep highlight details, I would recommend to properly expose images and even slightly over-expose, then recover the data in post. This technique is known as “Exposing to the right” and it gives you better results, especially when dealing with noise.
- Dust Delete Data – this is used for removing dust in images if you have dust particles on the image sensor. I never use this feature, since I prefer cleaning the camera sensor instead.
- Multiple exposure: Disable – this is used for creative photography when stacking photos on top of each other.
- HDR Mode: Disable HDR – only relevant when shooting in JPEG mode.
Shoot Menu 4
- Interval timer: Disable – built-in intervalometer for shooting timelapse sequences. Sadly, you can only specify up to 99 shots, but if you leave it at 00, the camera will take photographs indefinitely.
- Bulb timer: Disable – disabled in all normal modes, so you can only activate it when you select “B” from the PASM dial. Now this is a killer feature and something that I wish every camera had. Many DSLRs are normally limited to 30 second exposures – anything longer requires a remote camera shutter release accessory that has the capability to hold exposure for longer than 30 seconds. The Canon 5D Mark IV has a built-in mode to set a specific timer in bulb mode, so you do not need any remote shutter release to be able to shoot for longer than 30 seconds. This is particularly useful when doing long exposure photography and when working with neutral density filters.
- Anti-flicker shoot.: Disable – if you shoot in artificial light covering sports or other events, this is another killer feature that can really help in obtaining images that are properly exposed top to bottom. As described in our light flickering article, shooting indoors can be quite challenging. Once you turn this feature on, the camera will automatically delay the shutter to match the light frequency.
- Mirror lockup: OFF – unless you want to reduce vibrations from the camera when the mirror is raised (when shooting at very low shutter speeds on a tripod), leave this turned off. When mirror lockup is on, pressing the shutter release or firing the camera with a remote will raise the mirror and the second time you trigger the shutter will start the exposure, then lower the mirror at the end of the exposure.