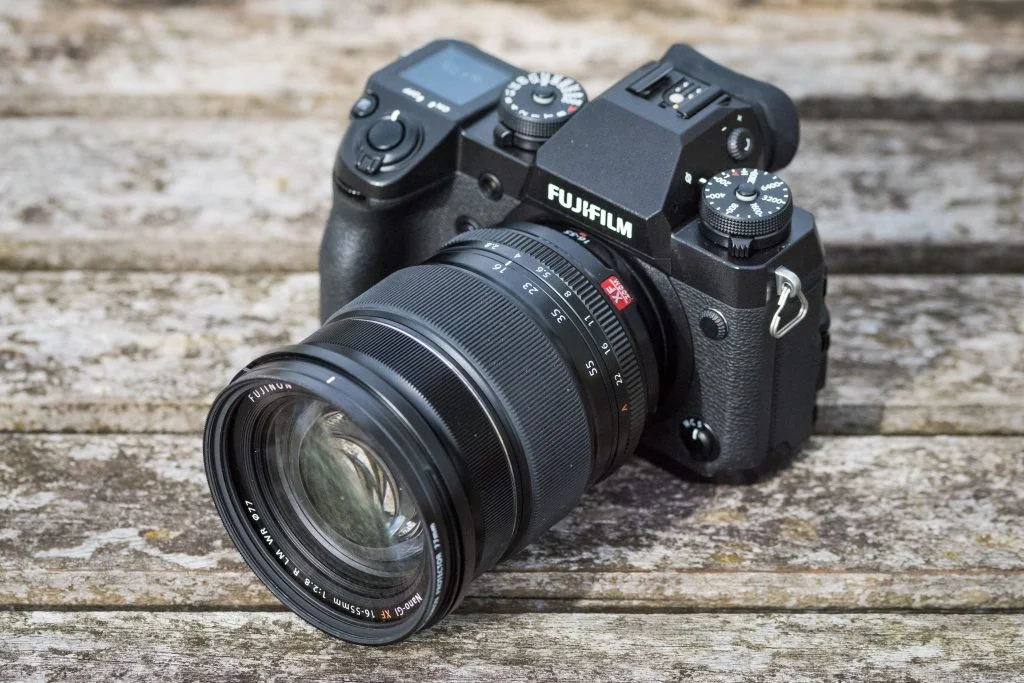
The Fuji X-H1 is the first of the X-series cameras that features in-body image stabilization. Ergonomically, Fuji incorporated a number of features from the high-end GFX cameras, so in a way, it can be thought of as a mini-GFX. I have been shooting with the Fujifilm X-H1 since it was announced, and I decided to write a detailed guide on how to best customize this camera. With so many controls and menu options, the X-H1 can be a bit confusing, especially for beginners. I hope the provided recommended settings in this article help in clearing up some of the confusion for our readers.
Controls and Handling
Similar to other Fuji X-series cameras, the X-H1 has a number of dials, buttons, and controls that perform different functions. It is easy for someone who comes across this camera for the first time to be a bit confused by all the options, which is why I will run through them all in this article.
Front of Camera
Let’s review all the buttons from left to right around the mount, as well as the front dial:
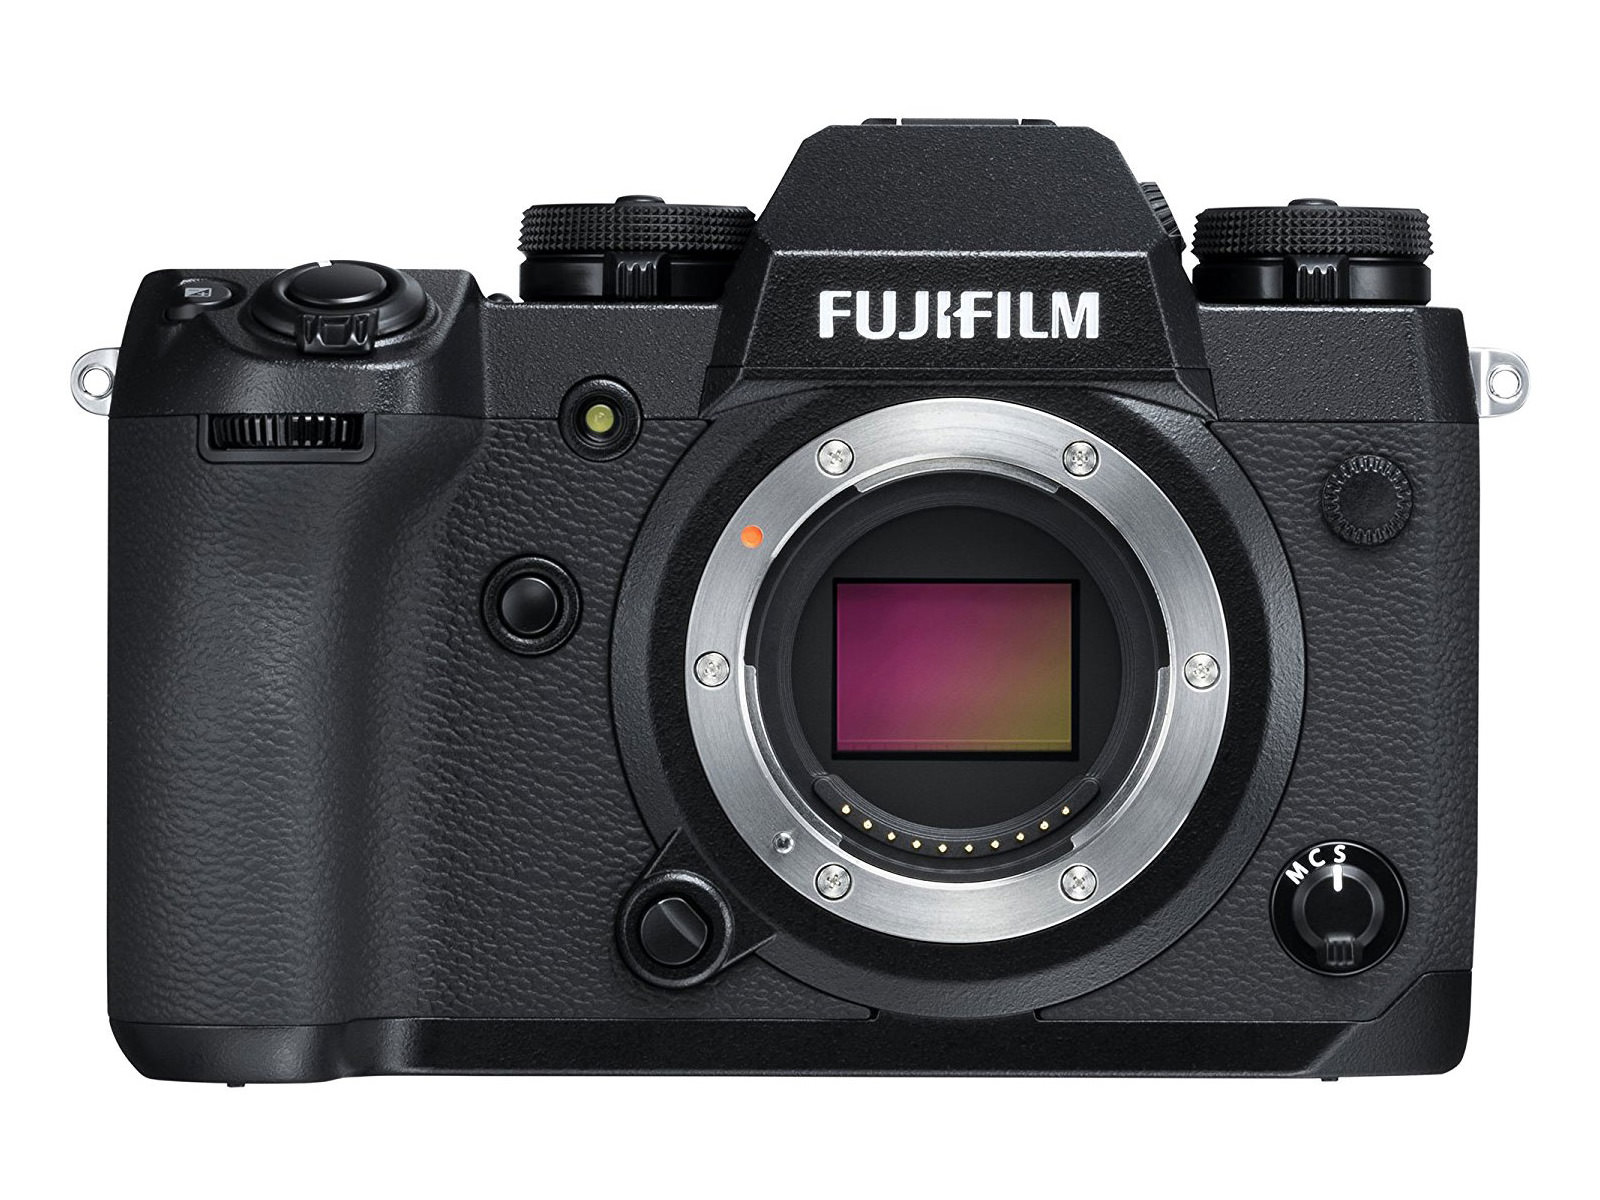
- Front Command Dial: Can control certain settings depending on how you’ve set up the X-H1. For example, in the Set Up Menu, set “ISO Dial Setting (A)” to “Command” (Set Up -> Button/Dial Setting) and you can use this command dial to change your ISO settings any time you have the top ISO dial set to A (Auto).
- Lamp: AF-Assist Illuminator shines light when there is not enough ambient light for focusing, or when self-timer is engaged.
- Function Button (Fn2): Customizable. I keep it at default “Drive” value.
- Lens Release Button: Hold the button and rotate the lens to detach it.
- M/C/S Switch:
- M: Manual Focus, although you can still press the AE-L button to autofocus, you can’t track a subject across the frame when focusing this way. If you have assigned “Focus Check” to a certain button in the Set Up menu, or enabled the dedicated “Focus Check” option in the AF/MF menu, autofocusing in M mode will magnify your LCD screen or electronic viewfinder view.
Top of Camera
Next, we will go over the top of the camera, from left to right:
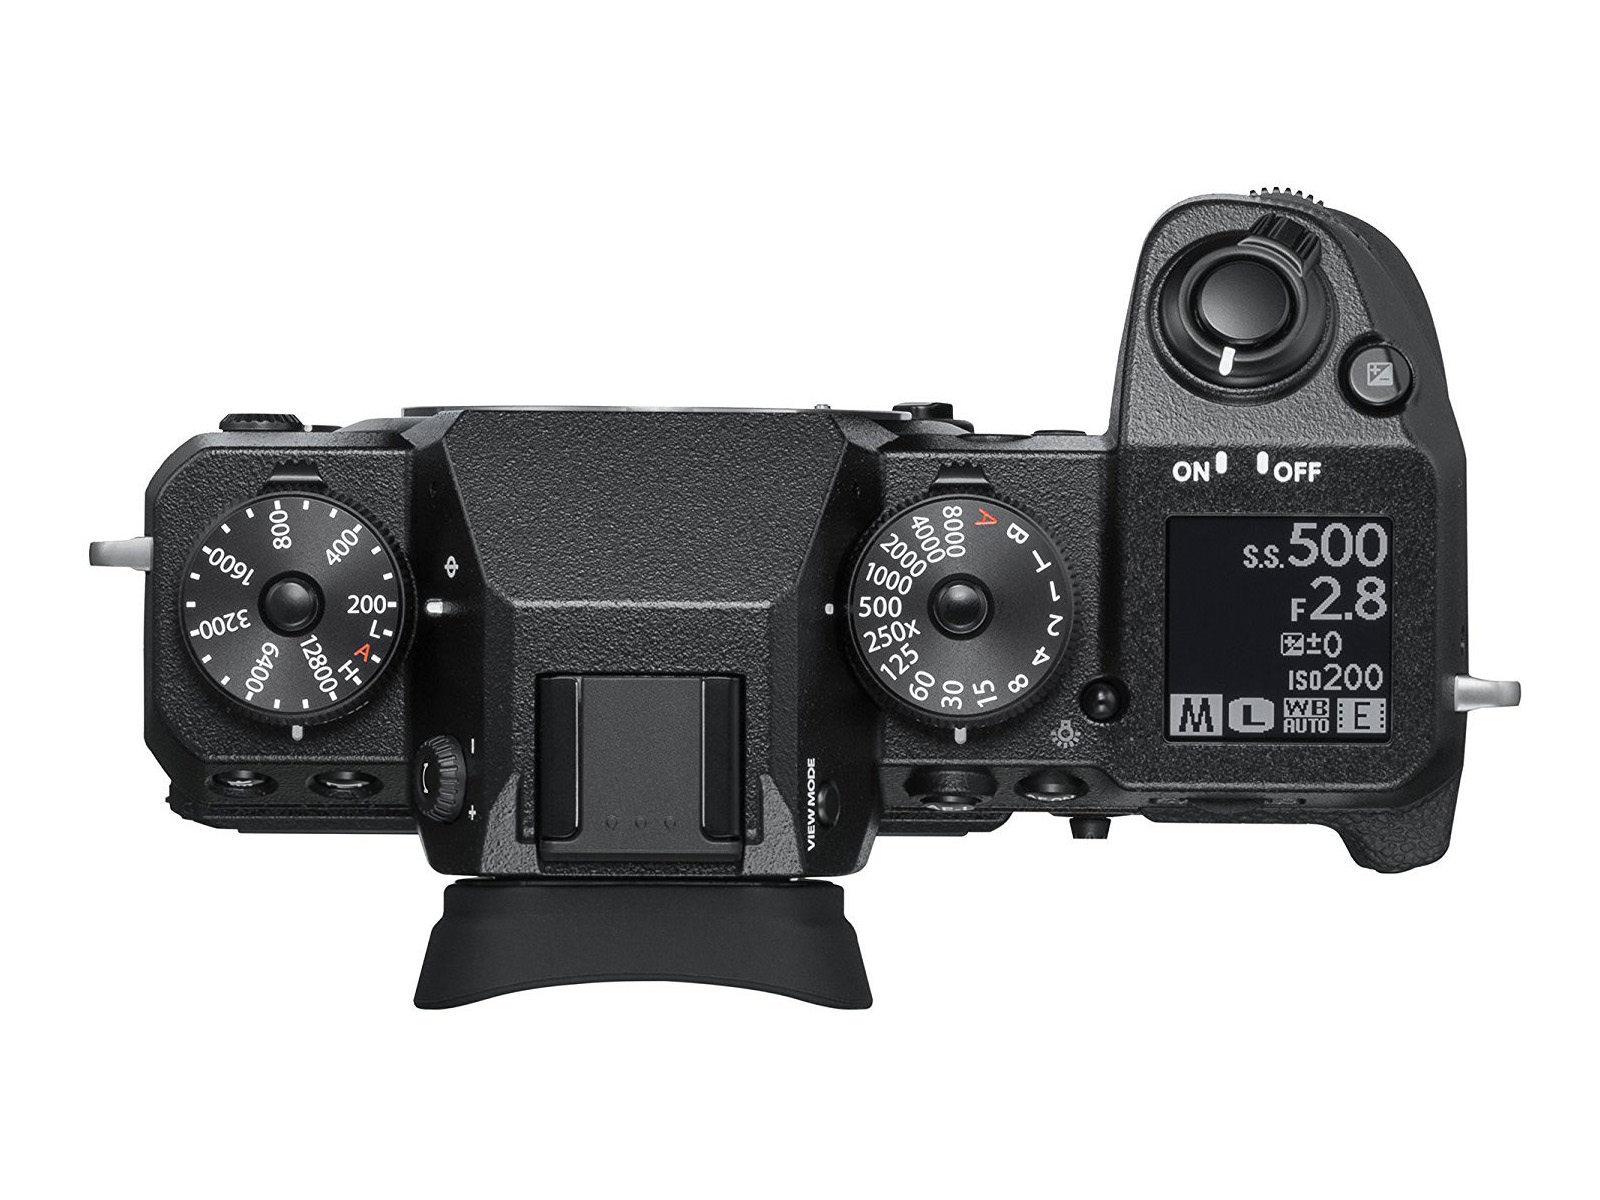
- ISO Setting / Drive Dial: Rotate this dial to change your ISO. By default, I keep it at “A” for Auto ISO. Once you choose a value, you can press the button on the top to lock it. The bottom of the dial allows changing the camera Drive.
- Diopter Adjustment Control: Adjust diopter to make viewfinder clearer and tailored to your eyes.
- View Mode Button: For switching between EVF and LCD. You can disable the viewfinder entirely, or enable it exclusively (disabling the rear LCD). You can also set it to detect your eye, switching between the rear LCD and the viewfinder when you look through the viewfinder, or disabling the rear LCD entirely and only turning on the viewfinder when you look through it. I set mine to Eye Sensor + LCD Image Disp, so that the camera automatically switches between EVF and LCD.
- Shutter Speed / Metering Dial: Use this dial to change your shutter speed. Set it to “T” and use the rear command dial if you prefer adjusting shutter speed that way. I typically set mine to “A” and set aperture through the lens, in order to shoot in Aperture Priority mode. For metering, I keep mine set to “Multi” by default, but depending on what I am shooting I also use “Spot” metering sometimes.
Back of Camera
Lastly, let’s review the back of the camera, once again from left to right:

- Trash Button: Deletes images
- Review Button: Plays back your images
- AE-L: This button can be programmed under “Function (Fn) Setting” in the Set Up menu (Set Up -> Button/Dial Setting). By default, holding it down locks exposure. I prefer changing the menu option “AE/AF-L Lock Mode” to “AE&AF On/Off Switch”, so that simply pressing the AE-L button locks autofocus, without having to continue to hold it.
- AF-ON Button: A dedicated button for focusing, which is very useful when doing back-button focusing.
- Rear Command Dial: Can serve a number of functions, including changing shutter speed if you have the top shutter speed dial set to T. You can also scroll this wheel to change the size of your autofocus zone once you press in the joystick. And in playback mode, push in this dial to instantly jump to magnified view. Note that due to a design flaw on Fuji cameras, you need to be shooting RAW + JPEG rather than just RAW if you want to magnify your photos to 100% in playback mode.
- Joystick: This is how you move autofocus points. Press in the joystick and rotate the rear command dial to change the size of your autofocus zone.
- Q button: Pops up a quick menu where you can change some common settings. You can adjust your personal Q menu in the “Edit/Save Quick Menu” setting in the X-H1’s Set Up menu.
Fuji X-H1 Camera Settings
Now that we went through all the essential buttons and dials, it is time to take a deeper dive into the camera menu in order to set it up optimally. Please keep in mind that these recommendations are not a one-size-fits-all answer. It’s intended to set you on the right path, but there is a reason why Fuji has so many options here – everyone’s needs are different. So, feel free to take these as a starting point, but don’t be afraid to pick different settings for yourself as needed.
Image Quality Setting
- Image Size: Grayed-out (because of shooting RAW); when shooting JPEG pick “L 3:2” for maximum size
- Image Quality: RAW
- RAW Recording: Lossless Compressed
- Film Simulation: Standard (doesn’t affect RAW photo)
- Grain Effect: Off (doesn’t affect RAW photo)
- Dynamic Range: DR 100% (doesn’t affect RAW photo)
- D Range Priority: Grayed-out
- White Balance: Auto (doesn’t affect RAW photo)
- Highlight Tone: 0 (doesn’t affect RAW photo)
- Shadow Tone: 0 (doesn’t affect RAW photo)
AF/MF Setting
- Focus Area: Shows all focus points and lets you select yours, akin to pressing in the joystick. Turn the rear dial to change the size of your focusing zone.
- AF Mode: Single Point, since it gives you the finest control for focusing in most cases. If you want to track subjects, it is best to use Wide/Tracking and then enable continuous autofocus via the switch on the left of the camera. To track subjects across a smaller portion of the frame, but not just a single point, use Zone and change its size to suit your needs by pressing in the joystick and then turning the rear dial to change the size of your focusing zone.
- AF-C Custom Settings: The default value of 1 (Multi Purpose) works well for most subjects. Depending on what you are shooting, you might want to adjust this setting.
- Store AF Mode by Orientation: For storing focus points differently when shooting vertical vs horizontal. I set mine to “On”.
- AF Point Display: This only matters when you are in Zone or Wide/Tracking AF Modes, not Single Point. It simply shows your focusing points, which some photographers will find helpful and others distracting. I leave mine Off.
- Number of Focus Points: 325 (only available in Single Point) since it gives you the most control. Some prefer 91 simply because you can switch between them faster, since fewer are available.
Shooting Setting Menu
- Drive Setting: Choose from different drive settings and customize them. I personally set my Bracketing Setting for the following: Bkt Select -> AE Bkt. AE Bkt -> 3 Frames, 1 EV Step. Sequence Setting -> “- 0 +”
- Self-Timer: Off for taking photos without a delay, 2 seconds for tripod-based landscape work, 10 seconds when you need to run in front of the camera and join a group photo
- Interval Timer Shooting: For taking timelapses. It lets you select the interval between shots and the total number of photos.
- Shutter Type: E-Front + Mechanical + Electronic. The camera automatically switches between different shutter types depending on the shutter speed.
- Flicker Reduction: On.
- ISO Auto Setting: Lets you adjust the behavior of Auto ISO. This is an important setting, and the X-H1 gives you the ability to set up to three different Auto ISO defaults that you can select depending upon the occasion. “Default Sensitivity” is the ISO that the X-H1 will attempt to use. It will only use a higher ISO if your scene is dark enough that your shutter speed has reached the “Min Shutter Speed” value you set. “Max Sensitivity” is the highest ISO value that the X-H1 will use, no matter what. If you’re taking pictures in such a dark scene that your Max Sensitivity and Min Shutter Speed values have already been reached, the X-H1 will use longer shutter speeds rather than increase ISO any further.
- ISO Mode: Continous.
Flash Setting Menu
- Flash Function Setting: Main flash control. Off when you don’t need flash, typically TTL when you do (through-the-lens automatic flash).
- TTL Mode: TTL
- Zoom: Grayed Out
- Sync: Fire the flash at the beginning of your exposure (1st Curtain) or at the end (2nd Curtain). When photographing moving objects, you generally will want to change Sync Mode to be 2nd Curtain to capture the motion of the subject before the flash properly – the blur leading into a sharp subject.
- Angle: Grayed Out
- Red Eye Removal: Off
- TTL-Lock Mode: TTL Lock gives you a consistent flash exposure across several images when enabled (which must be done via a custom function button you assign). This chooses whether the exposure is locked at the prior metered exposure or by metering via a set of pre-flashes.
- LED Light Setting: Lets you use the video light on your flash to act as a focus assist beam and/or a catchlight. Keep it off unless you have a need for either of those features. Grayed out except with external flash.
Movie Setting Menu
- Movie Mode: 4K 23.98P
- Full HD High Speed Rec: 5x 23.98P
- Film Simulation (Movie): Standard
- Dynamic Range (Movie): DR 100%
- White Balance (Movie): Auto
- Highlight Tone (Movie): 0
- Shadow Tone (Movie): 0
- Color (Movie): 0
- Sharpness (Movie): 0
- Noise Reduction (Movie): 0
- F-Log Recording: Off
- Peripheral Light Correction (Movie): On
- Focus Area (Movie): N/A
Set Up Menu
- User Setting
- Format: To format your memory card
- Date/Time: To change the camera’s internal clock
- Time Difference: To tell the X-H1 when you are in a different time zone and adjust the internal clock accordingly
- Language: Select default language
- My Menu Settings: Add, rank, and remove items from your “My Menu” – very useful
- Sound Set-Up
- AF Beep Vol: Off
- Self-Timer Beep Vol: Off
- Operation Vol: Off
- Shutter Volume: Off if you want only noises from the mechanical shutter. For 100% silent operation, turn this off and enable electronic shutter only (from “Shutter Type” under the Shooting Setting menu). If it’s disconcerting to hear no noise at all while taking pictures with the electronic shutter, such as when looking through the optical viewfinder, turn the volume to low.
- Screen Set-Up
- EVF Brightness: Auto
- EVF Color: 0
- EVF Color Adjustment: Default
- LCD Brightness: 0
- LCD Color: 0
- LCD Color Adjustment: Default
- Button/Dial Setting
- Focus Lever Setting: Affects whether moving the joystick changes autofocus points. When set to Lock, you can’t move autofocus points with the joystick at all. Set to “Push Joystick to Unlock,” you can only start moving your autofocus points when you push in the joystick once. Set to On, you move autofocus points any time you move the joystick. I keep it On.
- Edit/Save Quick Menu: A very useful option to adjust the layout and content of the Quick Menu (accessed by pressing the Q button). Change this to suit your shooting style and most frequently accessed controls.
- Function (Fn) Setting: Lets you assign custom functions to six FN buttons, AE-L, AF-ON, as well as touch controls and the rear dial. This is down to personal preference, but it is a good way to access settings you use all the time without entering a menu. Here is what I set to mine, in order: Fn1 (Exposure Compensation), Fn2 (Drive), Fn3 (AF Mode), Fn4 (ISO Auto Setting), Fn5 (Face/Eye Detection Setting), Fn6 (Preview Depth of Field), T-Fn1 (Histogram), T-Fn2 (Performance), T-Fn3 (Natural Live View), T-Fn4 (Electronic Level), AE-L (AE-L), AF-ON (AF-ON), R-Dial (Focus Check).
- Power Management
- Auto Power Off: 2 Min (personal preference)
- Performance: Normal
- Save Data Set-Up
- Frame Number: Continuous. If you select Renew, the camera will begin file names from 0001 each time you format your memory card or insert a new one, resulting in more photos with duplicate names
- Save Org Image: Off. When On, saves two copies of a photo when redeye reduction is enabled (one without the reduction applied). No other effect on your photos.
- Edit File Name: You can give your photos custom file names to start the image, such as FUJ_0001. I customize this for each camera I own in order to reduce duplicate file names from multiple cameras. The X-H1 lets you choose different file names for sRGB and Adobe RGB images.
- Card Slot Setting (Still Image): Sequential.
- Select Slot (Stills Sequential): 1
- Select Slot (Movie Sequential): 1
- Select Folder: Don’t Change
- Copyright info: Fill in your information in case you lose your camera or it gets stolen.
- Connection Setting: Set your preferences for connecting the X-H1 to other devices, including a phone.
Hopefully you have found all the recommended settings above to be useful for setting up your Fuji X-H1! If you have any questions about the information in this guide, feel free to ask below. Please keep in mind that most of these settings are personal preferences, and it is not a problem if your own preferences are different; after all, Fuji included all these options for a reason, and not everyone will set up their camera the same way.