I am. Throughout this course, I will walk you through the fundamentals of using Photoshop. People who are new to Photoshop and wish to learn the fundamentals of the program are the target audience for this session.
I will be going over:
- Starting a New Project:
- Simple Tools.
- Layer, Groups, and Tutorials
- Filters and Image Adjustments
- Creating A Wallpaper
- Computer
- Photoshop (I will be using Photoshop CS6)
Step 1: Creating New Project
1. Open Photoshop.2. Go to 'File > New' or Press Ctrl/Cmd + N.
3. A window will now open which will have:
- Name - This is the name of your document.
- Width - This is the width of your document.
- Hight - This is the hight of your document
- Resolution - This is resolution of your document. 72 PPI is used for Web and 300 PPI is for Print. PPI stand for 'PixelsPerInch'
- Color Mode - This is the colour type for your document. I suggest you leave it as RGB Color for now and keep it as 8 Bit
- Background Contents - This is what your background will be. I suggest you leave it as White.
- Advance Settings - This is for advance users. You can just leave it as it is.
Hear are some common document sizes:
- 720p - 1280x720 @ 72 PPI
- 1080p - 1920x1080 @ 72 PPI
- A4 - 595x842 @ 72 PPI OR 2480x3508 @ 300 PPI
- A3 - 842x1191 @ 72 PPI OR 3508x4962 @ 300 PPI
Step 2: Basic Tools
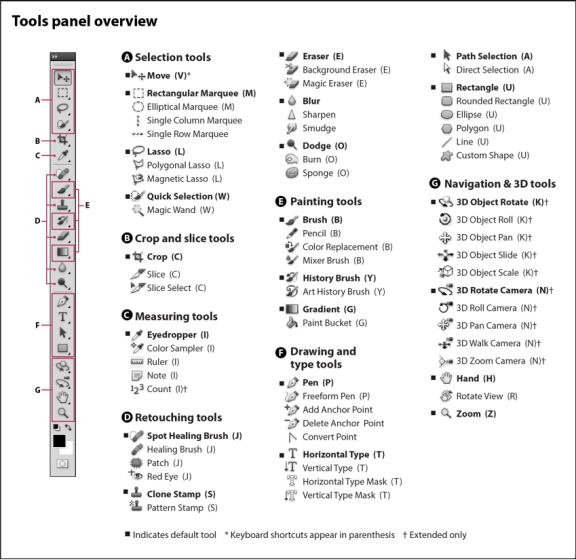
I will be going over the Basic Tools you will need to know to get started on Photoshop.
Move Tool:This tool can be used to move items around
Marquee Tool:This tool can be used to make selections. There are four different types which are:
Rectangular - This will make a Rectangular selection
Elliptical - This will make a Elliptical selection
SingleColumn - This will make a Column selection
SingleRow - This will make a Row selection
This tool can also be used to make selections. There are three different types which are:
Lasso - This can make free hand selection
PolygonalLasso - This will make selection with lines
MagneticLasso - This will make selection by shaping onto objects.
This tool can be used to make selection of objects by painting on them with an adjustable brush.
Crop:This tool can be used to trim images.
Eraser:This tool can be used to erase pixels of an image.
Brush Tool:Paints a brush stroke.
Pencil Tool:Paints are hard-edge stroke.
Gradient:This tool can be used to make a straight-line, radial, angle, reflected, and diamond blends between colors.
Paint Bucket:Fills similar coloured areas with the foreground colour
Pen:This tool can be used to create smooth-edged paths. You can use the Freeform Pen to create paths free-handed.
Step 3: Layers, Groups and Guides
Layers are what they say there are, Layers. Layers are very useful in Photoshop. Each layer is an individual which means you can edit it without editing any of the other layers.CreateNew Layer. To create a new layer go into 'Layer > New > Layer' or by click the box with folded conner at the bottom right hand conner of the window.
LockingLayers. Layers can be locked which means that they can't be edited until you unlock it. There are Three different types of Locks.
- LockTransparentPixels - This will make the pixels you erase black instead of getting rid of them.
- LockImagePixels - This will mean you can't change the pixels into anything such as colouring it in.
- LockPosition - This will mean you are not able to move the image.
- The last one will lock everything which mean you will not be able to edit it at all.
LayerStyle. This are some setting that can be changes to make the layer look different. To open the layer style window just double click the layer which will open a new window. Some things you can do are:
- Opacity - Change the opacity of the layer.
- Stroke - Put an outline on the layer.
- InnerShadow - Puts a shadow inside the layer which give it an effect of it is going inside.
- InnerGlow - Put a glow on the inside.
- ColorOverlay - Put a colour on top of the layer.
- GradientOverlay - Put a gradient on top of the layer.
- PatternOverlay - Put a pattern on top of the layer.
- OuterGlow - Put a glow outside the layer.
- DropShadow - Put a shadow underneath the layer which give the effect of it floating.
Guides. Guides are very useful. To make a new guide go to 'View > New Guide'. This will bring up a new window. You can choose weather the guide is vertical or horizontal. Then write where it is. I recommend you use '%'. I suggest when you start a new project you make two guides, one vertical at 50% and the other horizontal at 50%.
Step 4: Filters and Image Adjustments
NOTE: For this section you will need a picture. Make sure your photo hash't been edited.
1. Open Photoshop.
2. Go to 'File > Open' or Click 'Ctrl/Cmd + O'. Then select the photo you have choosen.
Image Adjustments.
Brightness and Contrast
1. Go to 'Image > Adjustments > Brightness/Contrast'
2. You will now see two sliders, one for the brightness and the other for contrast. Play around with the slider till you think your photo looks better
Vibrane
1. Go to 'Image > Adjustments > Vibrance'
2. You will now see to slider, one for vibrance and the other for saturation. Play around with the slider till you think your photo looks better.There are a lot of other settings you can change. If you want to know what they all do you should play around with them. The main reason you would use them is to change the colour of a picture.
Filters.
1. Go to 'Filter > Filter Gallery'. This will open a new window. You might have to the zoom from '100%' to 'Fit in View'. This is located at the bottom left corner of the window.
2. You will have a lot of different filters so the best thing to do is look at all of them and pick the best one.