
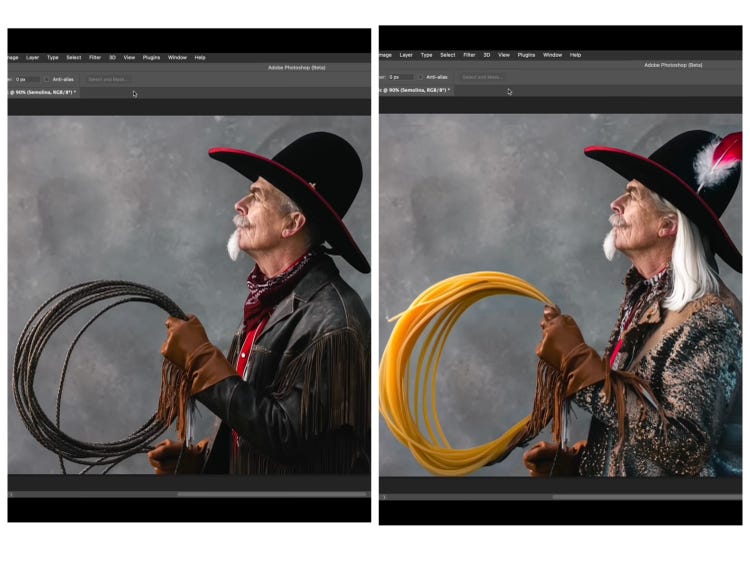
Ideally, all pictures that we might be clicking would turn out to be flawless. The intention of most photographers is to take sharp, in focus photography and occasionally, even professionals fail. There is nothing worse than getting home at the end of a shoot to realize that your favorite photo was blurry.
The good news? The editing tools of the day can salvage the images that are slightly blurred. When the focus is slightly out of focus, in most cases, you can sharpen the picture so that it can be used.
I will explain to you below, how to correct blurry photos in Photoshop, as well as give some additional tips on how to prevent blur in the future.
How to Fix Blur Pictures in Photoshop
1. Open Your Image in Photoshop
- Start Photoshop and open your photo, which is blurred.
- On the Layers panel, the background layer has a lock icon which is to be unlocked.
2. Duplicate the Background Layer
- As the photo layer is selected, press Command/Ctrl + J (Mac/Windows respectively).
- This is what makes a duplication of the layer, therefore, you are able to sharpen the image without affecting the original.
- It can also be easily compared before and after or readjusted later, with ease since it is easy to duplicate.
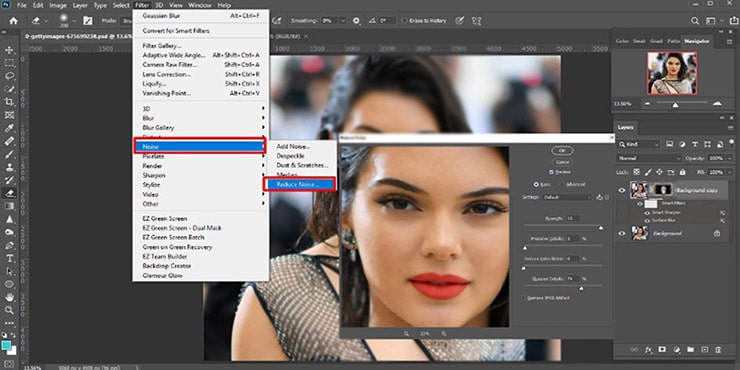
3. Apply the Unsharp Mask
- Filter Sharpen unsharp mask.
- In the dialog box:
- Set Amount to around 150%.
- Keep Threshold at 0.
- Start with a Radius of 1 pixel, then gradually slowly increase the Radius until the image appears to be sharper.
- The radius could be between 1-25 pixels depending on the size of the photo, and the level of blur.
4. Final Adjustments
Click the OK button to implement settings.
- To preview the change, in the Layer panel, turn the eye icon on and off.
- In case the sharpening appears too aggressive reduce the layer levels to a natural feel.
Off the Record: The Unsharp mask is used to sharpen edges through an increase in contrast. When your photo is so much out of focus and edges can be identified without any effort, then this trick cannot do miracles.
Recomanded to read :- How To Use Marquee Tool In Photoshop
Extra Photoshop Tricks for Better Results
Selective Sharpening with Layer Masks
Only sharpen part of the picture, such as the face of a subject, but keep the background soft?
- Put a layer mask over the sharpened layer.
- Use black brush to paint where on the mask you do not need sharpening to be indicated.
Avoid Over-Zooming
Consider the way you will use the photo.
- With instagram or facebook it is not necessary to check every pixel.
- When the print is very big, then it might be necessary to zoom and refine further.
Tweak Settings for Each Photo
Every image is different.
- Move Amount and Radius independently.
- There is nothing like oversharpening and producing ugly halos and noise, thus strike a balance.
Try AI Plug-ins for Heavy Blur
When your image is extremely soft, it is possible to resort to a specific service, such as Topaz Sharpen AI.
It runs an artificial intelligence to analyze and sharpen images that the Unsharp Mask of Photoshop cannot perform.
How to Avoid Blurry Photos in the Future
Post sharpening is a good idea, yet there is nothing like prevention. To maintain a sharp image in the field, follow these tips:
Watch Your Shutter Speed
After all, a rule of thumb is to make your shutter speed at least equal to your focal length.
- Example: shooting at 80 mm? Use 1/80 sec or faster.
- At 300 mm? Aim for 1/300 sec or faster.
A high rate of speed is essential in the transportation of items such as cars or birds.
Use a Tripod
A tripod will put your camera down and make you break your legs.
Autofocus can also be shut off when dealing with non moving objects as soon as you are in focus to avoid focus hunting.
Check Images on Location
- Immediately through your camera image view and zoom, identify problems.
- In case a shot appears soft, reshoot in the location.
Enable Eye Autofocus
A number of modern cameras have the Eye AF that focuses on the eyes of a subject - ideal in capturing a portrait of a person or animal.
Final Thoughts
Unsharp Mask in Photoshop is a useful tool in restoring slightly blurred images. Although it is not able to save each shot, thoughtful settings and non-obligatory AI plug-ins can help a lot.
Nevertheless, prevention is the most appropriate:
- Use the right shutter speed.
- Use a tripod to stabilize a camera.
- Review images in the field.
These steps are sure to save you time that would be spent in fixing blurred photographs, and more time will be spent in having an absolute clear picture.
FAQs
What should I do to enhance the quality of pictures?
Begin with light and steady hand. Use maximum resolution of your camera. Shooting, sharpening, contrast and noise reduction in Photoshop or Lightroom.
Can I upscale a blurry photo?
Yes, it is possible to enlarge images with the help of such tools as Photoshop or online websites like Let’s Enhance, which use AI to enlarge pictures. The outcome is different in case of a blurred original.
What do I do with bad quality pictures?
Enhance, sharpen, and adjust brightness and contrast, and noise-reduction filters. Take care to sharpen, or artifacts will be produced.
What is the name of the app that allows taking a blurry photo and making it clear?
The most popular are Adobe Lightroom, which can be used to professionally edit the photos, and Remini, a mobile application that employs AI to enhance the images by sharpening them and enhancing their quality.